Overview
This document is about the Various upload options present under the ORG Uploads menu in the BREEZ . There are 12 various upload options are present under ORG Uploads .
- Uploads -> OrgUploads
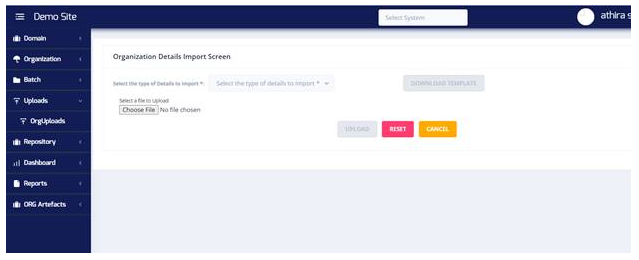
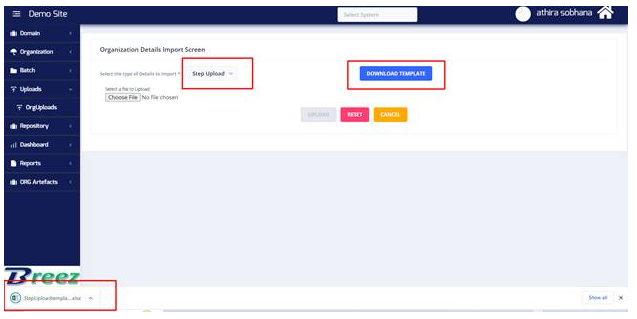
Step Upload
Step uploads under org uploads is used for uploading steps against its related objects to particular system code
Steps to be followed are as follows:
- Uploads -> Org Uploads -> select Step Upload from the Dropdown
- Click on Download Template button
- One Template(excel sheet) will downloaded
- Enter data on the downloaded Template and save
- Choose the updated excel in the choose file option and Click on Upload button
Template Sample ,meaning of each fields and data to be entered
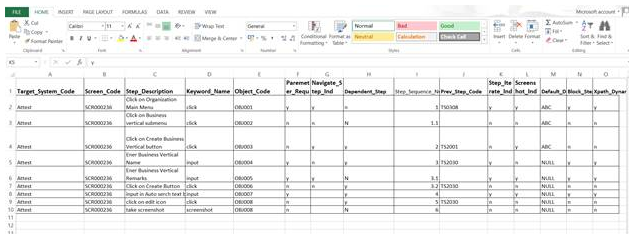
Fields and Data
- Target_System_Code : This field is for entering the Code of the Target system in which steps to be uploaded . Data should be the Code of Target System.
- Screen_Code : This field is for entering the particular screen code in which the steps to be created , Data should be the correct screen code of the particular screen which have to create steps
- Step_Description : Here user needs to enter the action of the step, for example if user needs to create a step to click on a button then step description should be like Click on Button.
4 .Keyword_Name : Here User needs to pass which keyword should contain in the step ,for example if user needs to create one step to enter data on a textfield then the keyword should be input, if user needs to create a step for clicking on a button or checkbox the keyword should be IsClickable or Click
5 . Object_Code : This field is object code of on which action needs to be taken. It can be fetched from the object list screen.
6 . Paremeter_Required : this is for verifying whether the step requires any data or not ,it depend upon the keywords used ,for keywords such as input,selectmatoptions,iscorrecttext etc requires data ,so for these keywords pass data as Y ,and for keywords such as click isclickable , clear etc parameter or data is not required so data for these should be N
(Pls refer Keyword document for more details which keyword has parameter Required or not)
7 . Navigate_Step_Ind : this is for marking the navigation step as Yes or No ,if user needs to select Navigation step pass Data as Y if not required data as N
If this step is selected then the step will get act as a Navigation step, for navigating screens.
8 .Dependent_Step : if user needs to mark any step as dependednt step the pass data as y else data as N (if some steps are having dependency that means one step can cause impact on the action of another step then user can map the previous step of that stepcode)
- Step_Sequence_Number : This is for sequencing the steps created through uploads, data can be pass like 1,2,3 or 10,20,30 as per the user.
10 .Prev_Step_Code : if The user is marking Dependent Step As Y then have to Enter the previous step code here else leave the field(the previous step we have to pass as the stepcode which having impact due to some other stepcodes))
- Mandatory Step Indicator: this is for mandatory step indicator ,data can be pass like Y/N ,if passing N steps will not be downloaded in test execution screen
12 . Screenshot_Ind : if passing data as Y then user will get screenshot while automation if it is N will not get screenshot,This field is for getting the screenshots of the particular screenshots of the application while automation.
13 .Default_Data : if parameter required is passing as Y then user can pass the required data over here else pass Data as Null, This field is required for Element extraction by maping parent child relation on screen.While extraction and automation system will pickup this data.
14 . Block_Step_Ind :for getting graphical representations data can be pass like Y/N,
15 . Xpath_Dynamic_Ind : in the related object if the xpath is dynamic then make this as Y else pass data as N(Pls refer Keyword document for more details and how to give dynamic xpath)
This is the template for uploading the steps in breez

2.downloading the template and after entering all the fields select the file and click on upload


Once after upload check in step screen, user can see the steps got created and it should display in the screen
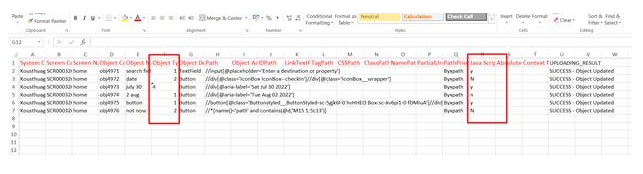
Object Uploads
Uploads -> Org Uploads -> Object Uploads -> Download Template


The downloaded excel sheet having two pages first sheet contains the fields to enter data and the second sheet contains the details of object types and the related system types
1.Target System and Screen Code: pass data as required to the user, This should be the Name of the Systemcode present in breez ,for uploading objects
2. Object Name : pass the object name, what data passing it should be the name of the object got created
3. Objcect Type: it is about the type of the object like Textfield, Button, dropdown etc ,in data need to pass the respective numbers .refer second sheet for type numbers
4. PATH : user needs to pass the object xpath over here, it should be proper,because system will identify the object by using this xpaths
5. PathPriority : here user needs to pass data according to the priority ,it can be ByXPath, ByXPath/ById/ByName, ByXPath/ById etc
6. IDPath : can be pass the Id if available or can pass NULL
7. LinkTextPath: data can be pass as NULL
8. TagPath: can be pass the tagname if available otherwise can be pass as NULL
9. ClassPath : if user aware of the class of the object can be pass that else can pass NULL
10. PartialLinkPath : can be pass as NULL
11. Object_Action : this should be the common xpath , either can pass as NULL
12. Java Script Executor Indicator : this is for the checkbox present in object screen if data is Y the checkbox should select if data is N it should not be select
13. Absolute Xpath : can be pass data as NULL
14. Context Name : it is applicable for mobile system types ,for other system types can be pass like Context Name as data

Once after uploads, objects and steps of that objects gets created. We can check in the object screen and step screen for the newly created objects and steps.
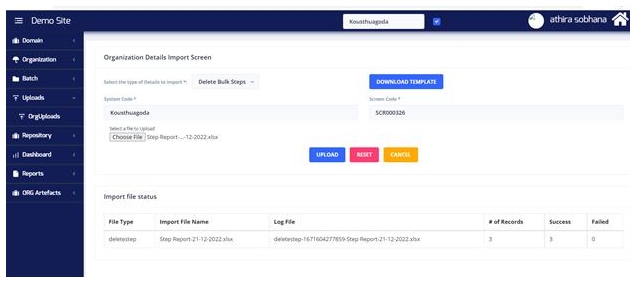
Delete Bulk Steps
Uploads -> Org Uploads -> Delete Bulk step ->select The required system Code ->select Screen code -> Download template
Here one excel should get downloaded having the details of the steps present in the selected screen
If user uploads this template and click on upload button all those steps will get deleted from the screen, if user don’t need to delete all the stepcodes ,then user can remove those stepcode details from the template and upload the rest, so whatever stepcodes mentioned in the template will get deleted

Have removed the required steps and uploading the steps which needs to be deleted
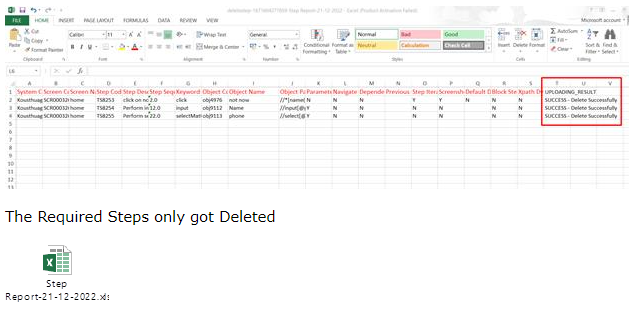
The Required Steps only got Deleted

Once after the process user can check in the step screen the deleted steps should not display in the screen
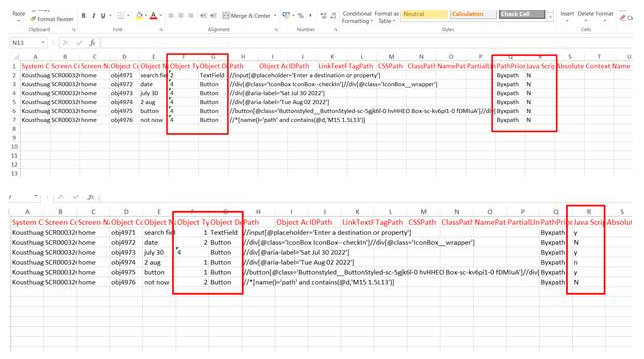
Delete Bulk Objects
Uploads -> Org Uploads -> Delete Bulk Objects - > select the required System code -> select the screen code -> click on Download Template
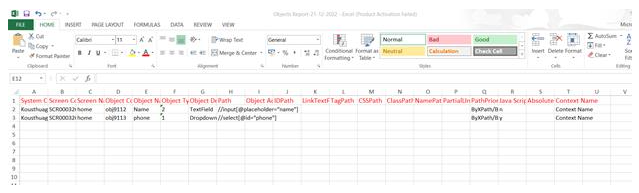
In the downloaded excel should containd all the details of objects present in the selected screen
If user don’t need to delete all the objects ,can remove those required objects from the excel sheet and upload the rest

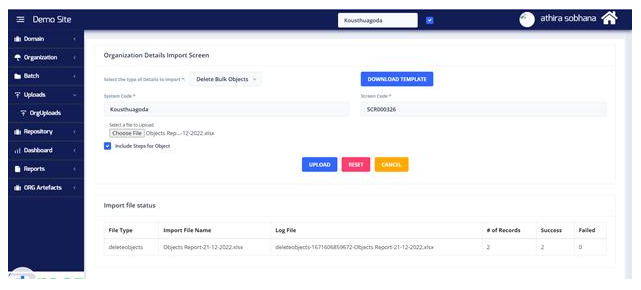
In the object delete uploads one more checkbox is present called Include steps for Object ,if user select this checkbox and then upload the template the related steps of the selected objects will also get deleted
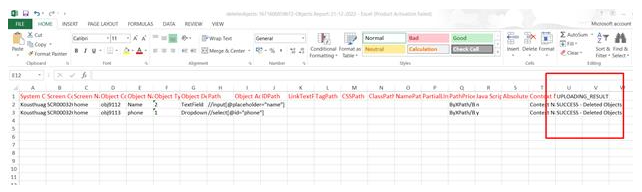
The objects got deleted. Once after the process check in the object screen the deleted objects will not display in the screen
Update Bulk Step
Uploads -> Org Uploads ->Update Bulk Step ->Select System Code ->Select Screen Code -> Download Template
This Upload is for updating the steps which are already present in the screen, if user needs to update the keyword, sequence number, screenshot required etc for large number of steps user can use bulk step uploads


Updated the required changes


Datas has been updated according to the user requirement for bulk steps

Once after the upload user can check in the step screen whether the datas has been updated
Update Bulk Objects
This upload is used to update the datas of the objects which are already present in the screen
Uploads ->org uploads ->Update Bulk Objects ->select system code ->select screen code ->Download template
In the downloaded Excel user will get all the object details of the selected screen ,from the excel user can update the values and can be uploaded

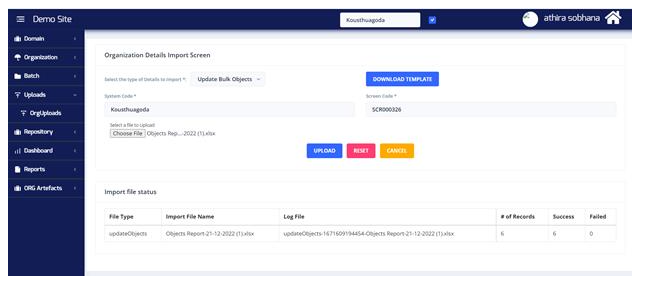
Datas got updated
Post upload process check in the object screen where the datas has been updated
Create TestData
This upload is for creating testdata for Automation
Uploads -> org uploads -> Create TestData ->Select System Code -> select project Code -> Select the Screen Codes required -> Download template


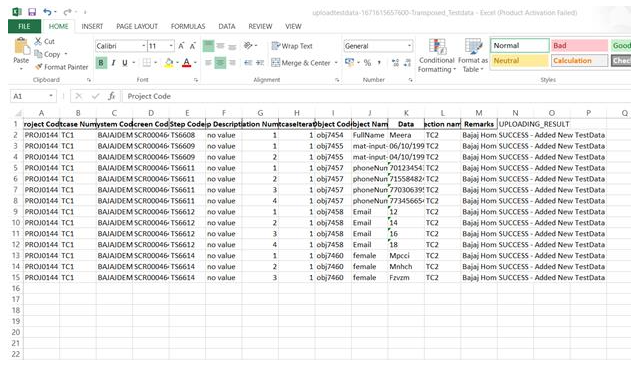
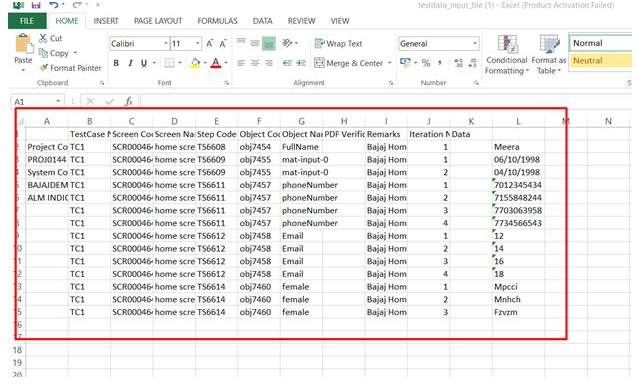
In the downloaded excel have two sheets
The first sheets contains below details
Project code,system code ,screen code,screen name ,object code, object name etc defaultly as per the datas selected from the uploads screen
Datas to be entered are
Testcase Number : here need to pass the correct TestCase Number as same as provided in the input file
PDF Verification StepCode : If verifyinputdatainpdf step is present in the input file then pass that particular stepcode in the data field other wise leave as blank
Remarks : It should be the Testdata type, if uploading it as blank the data as singledata, if passing remarks as singledata then also it will create testdata as singledata ,the other datas can be passed in remarks sessions are Repeatdata,randomnumber,repeatpattern etc
Iteration Number : default it should be 1, it is the testcase iteration number
Data : this field should be empty and need to enter the datas for testdata from the next cell onwards
ALM INDICATOR : It is for uploading logs in Attest, The data can be Y/N if it is Y logs should uploaded in attest and if it is N it should not

Second Sheet
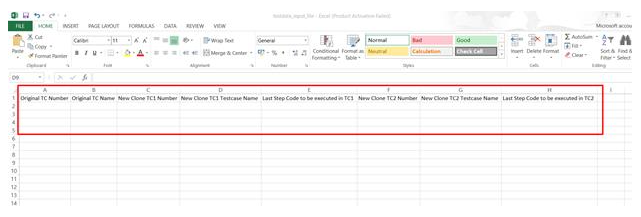
Original TC Number : pass the original Testcase Number which is passed in the first sheet
Original TC name : this is optional ,required while repeating testcase
New Clone TC1 Number : while repeating testcase for the first iteration pass the data over here
New Clone TC1 Testcase Name : While repeating testcase for the first iteration pass the testcase name here


Testdata has been created
After Upload process user can check the created testdata from Repository -> Testdata
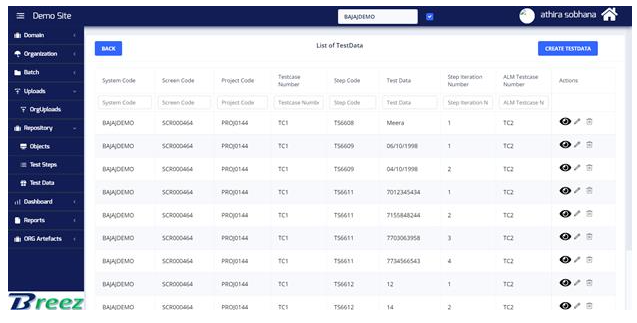
In Testdata screen displaying all the created Testdata

Update Testdata
This is for updating the created Testdata
Uploads -> Org Uploads -> update Testdata -> Select system Code ->Select Project code -> download Template


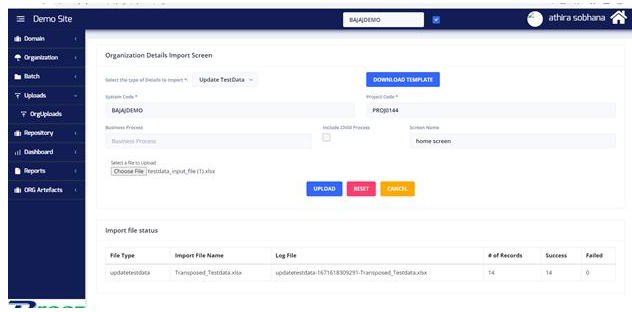
Testdata got updated

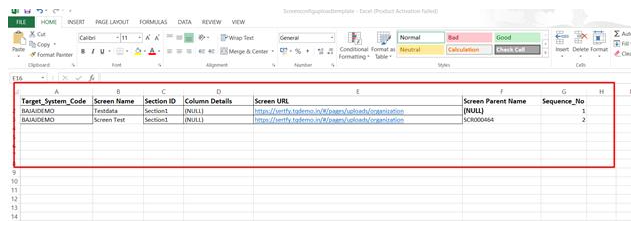
Screen Config upload

Uploads -> OrgUploads -> Screen Config Uploads -> download Template
This is for creating Screens for the Targetsystem
Target_System_Code : pass the system code0000
Screen Name : pass the name of the screen
Screen URL : enter the url of the screen to be created
Screen Parent Name : pass data of screen code if user needs to make the screen as a child of any other screen
Sequence_No : enter sequence numbers like 1,2,3…etc


Process screen Upload
From this user can map screens with process
Uploads -> Org Uploads -> Proces screen upload ->select System code ->Screen Code
If selecting screen code only that screen code will appear in template ,if not selecting screen code all screens will display
Process Name : enter the process name present in the system
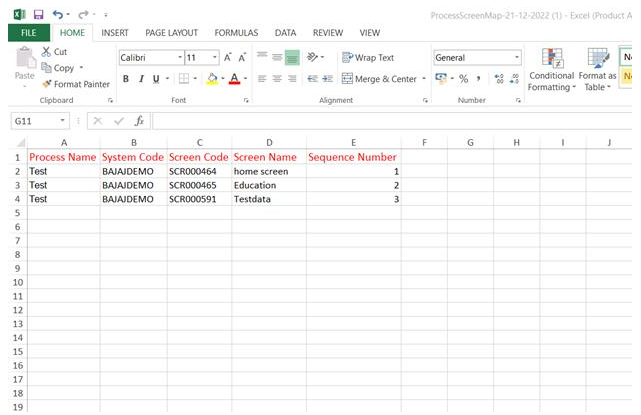
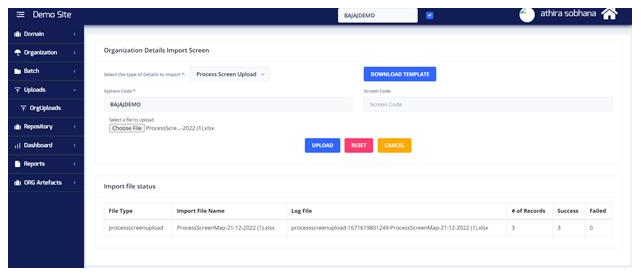

Screen has been mapped to the particular process
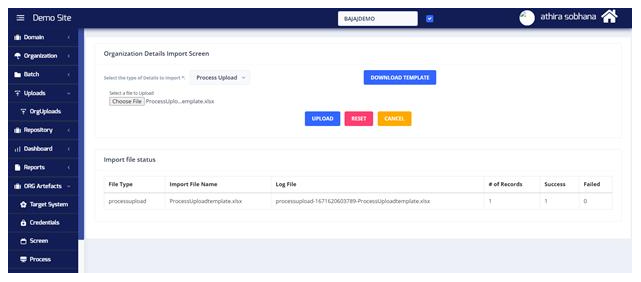
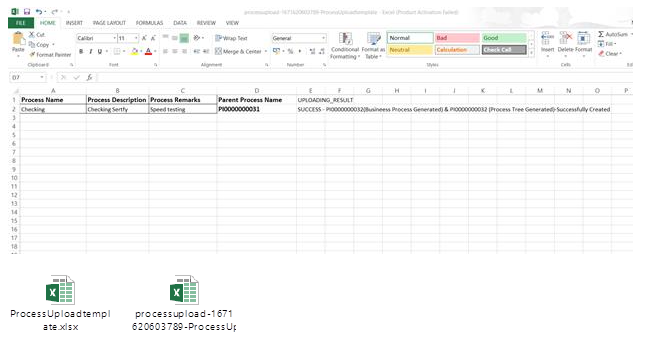
Process Upload
Uploads -> Org Uploads -> process Upload ->Download Template


Process Name : Enter the name of the process needs to be created
Process Description : Pass data for the purpose of the process which is created
Process Remarks : Enter data for the ramarks given to created process
Parent Process Name : optional ,if user needs to map parent enter the process Name
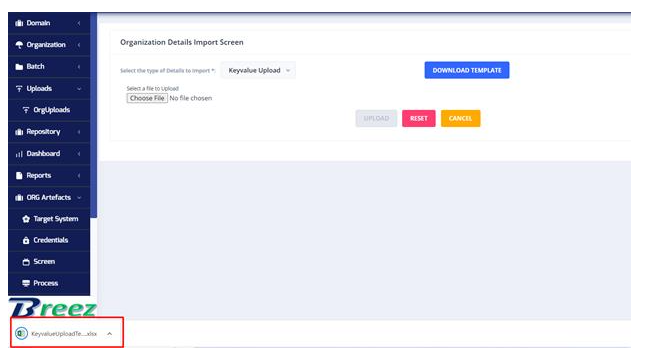
Key Value Upload
Uploads -> Org Uploads -> Key value uploads -> download Template
This is used for mapping testdata
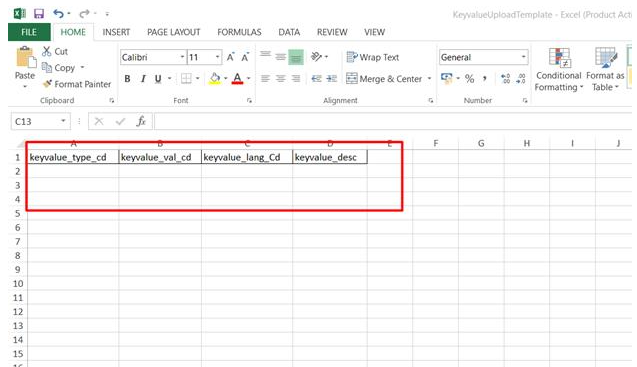
keyvalue_type_cd : pass the data for key value type , for example if user needs to create Testdata for cities of Bihar , then key value type data can be pass as
keyvalue_val_cd : the key value code data can be given as cities
Keyvalue description : here need to pass the testdata , for bihar cities eg patna


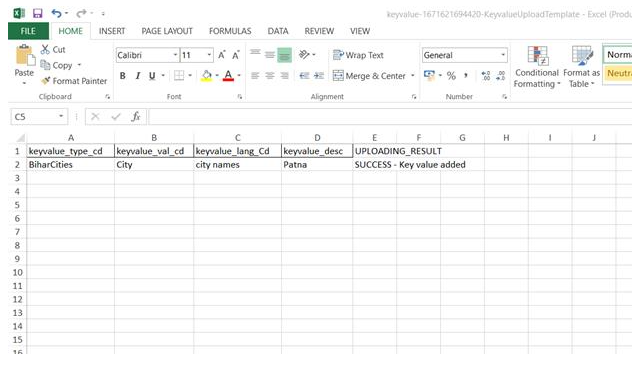
Keyvalue added