-
Overview
- Creating target system
- Creating credentials
- Creating Screen
- Creating Objects and Steps
- User need to click on the object of user name and then the popup screen will come and the user need to select the object.
- This is the pop up button for username and password object the user need to click in select
- After click in ob select button user can see the required object is selected in the field
This document is for Mobile Automation from the Breeze application. In this document we are going to start from the creation of the Target system to the automation. For Mobile Automation we have to do the following the things.
1.1 Creating Target System
Creating target system we have follow the given process.
Click on Create Target system and fill fields shown in Fig:01
ORG Artefacts -> Target System -> Create Target System
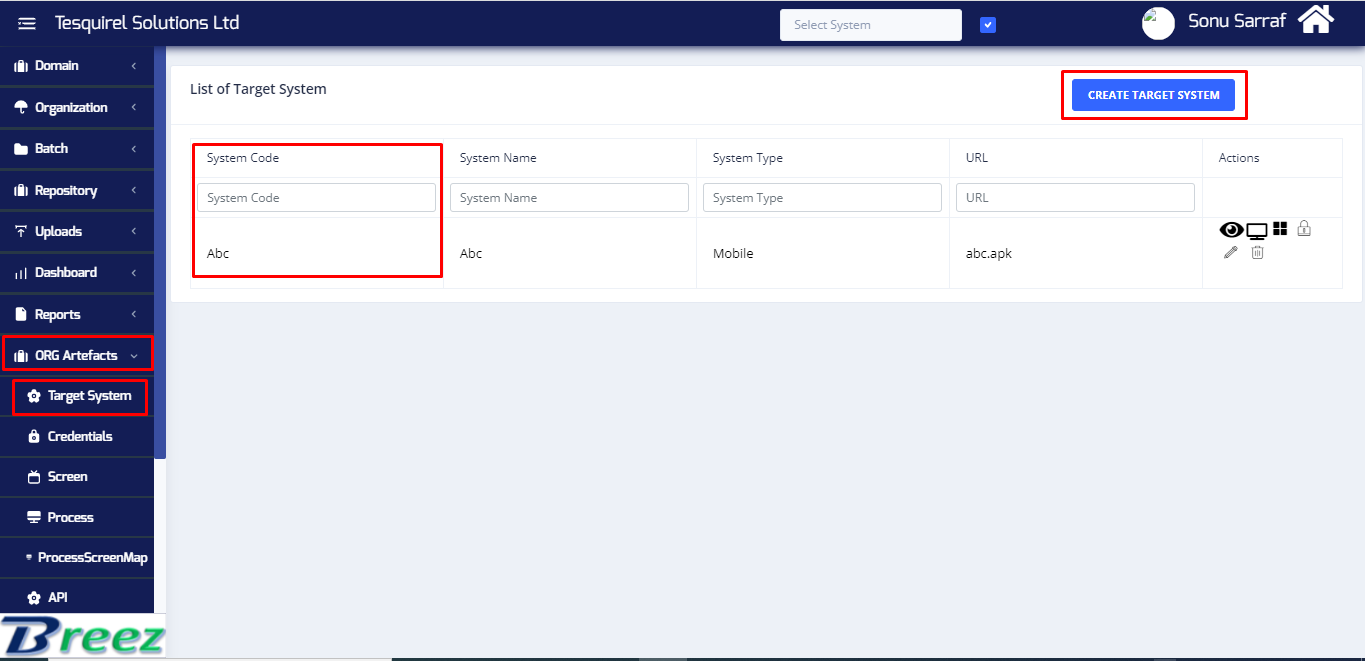
Fig:01-Target System
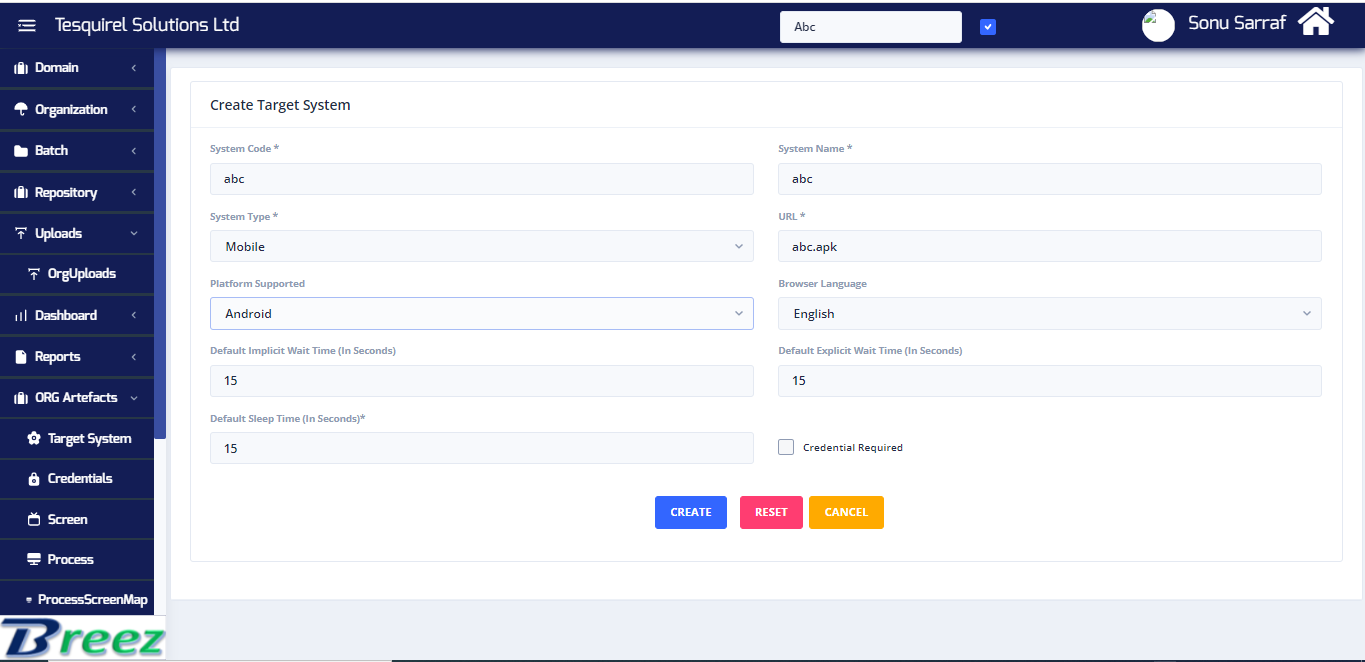
Fig:02-Create Target System
In Fig:02,Give the name of System code, Select Mobile as system type, Platform Supported as Android and In URL fields give the name of the APK for example (abc.apk, name of the application), Click on Credential Required if User Name and Password is required for login to the application, then click on Create.
Batch and Project will create automatically when user created the Target system. User can check the Project and Batch code, Project and Batch code is required for the automation. IN fig:03 Batch and Project is shown.
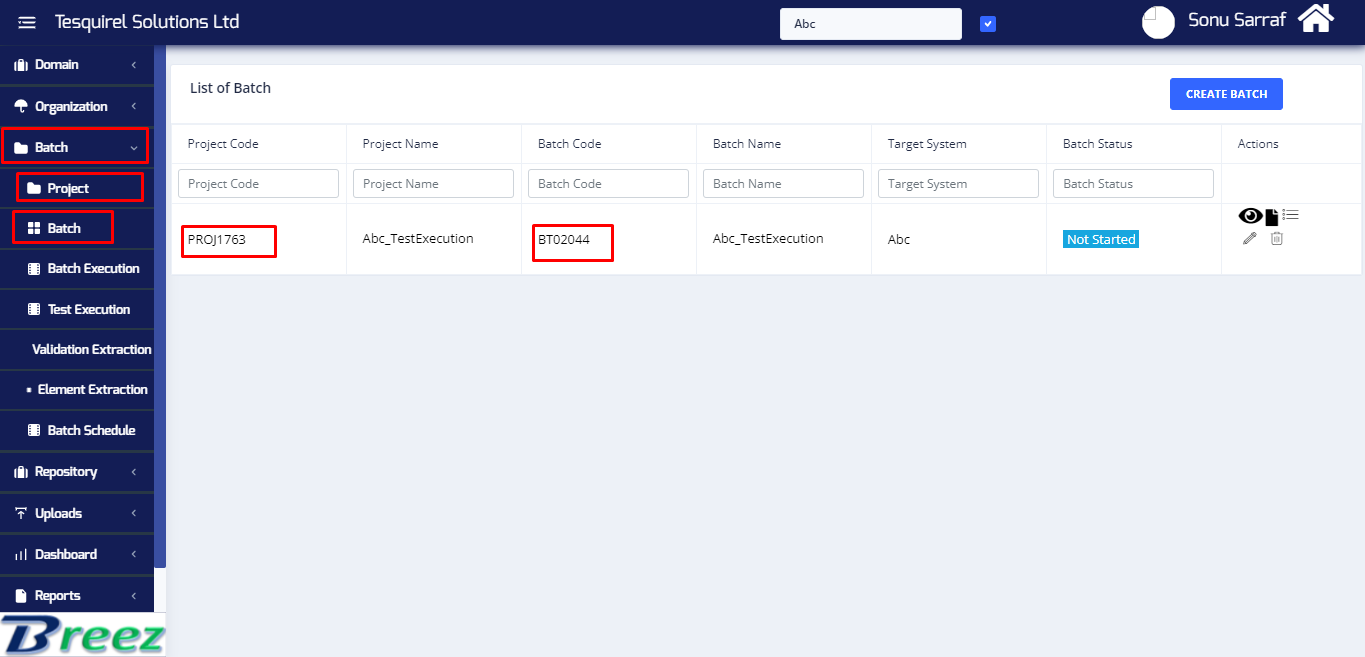
Fig:03-Batch and Project
1.2 Creating Screen
For Creating Screen select Goto
ORG Artefacts -> Screen -> Create Screen Configuration
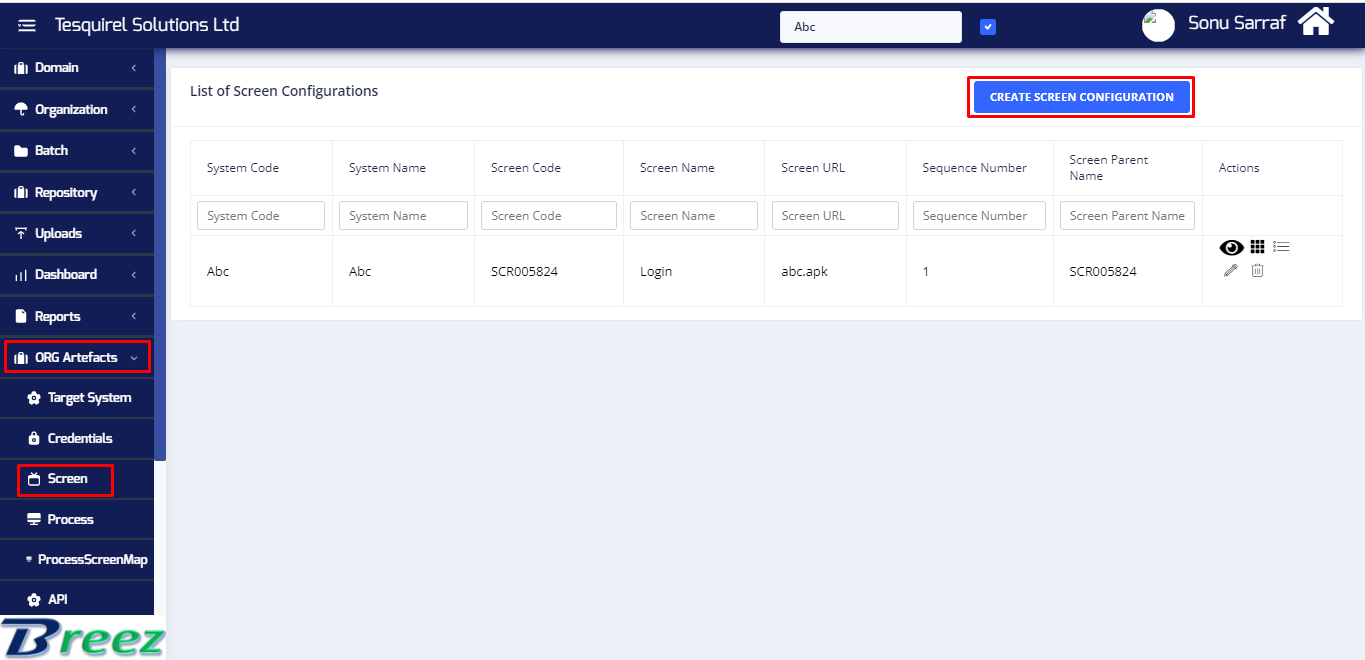
Fig:01-Create Screen
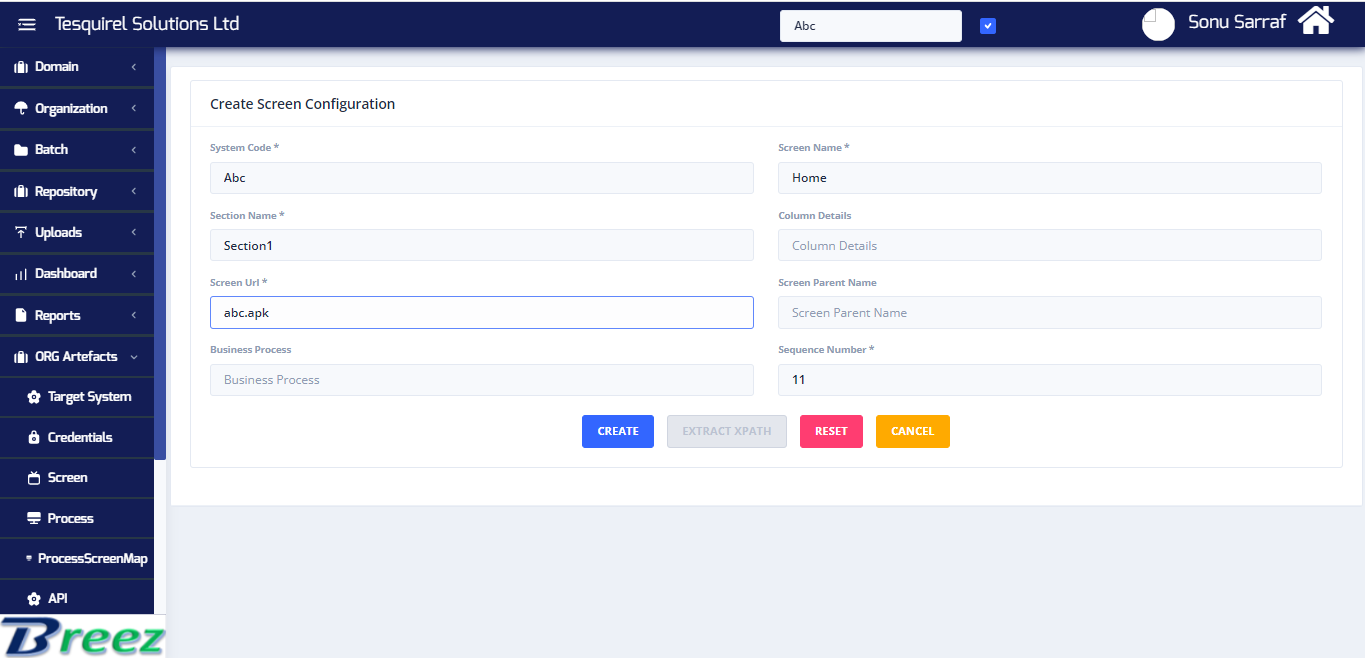
Fig:02-Create Screen Configuration
Give the screen Name and the Screen URL same as application name and then click on Create as shown in Fig:02
1.3 Creating Credentials
For Creating Credentials User have to goto
ORG Artefacts -> Screen -> Create Credentials
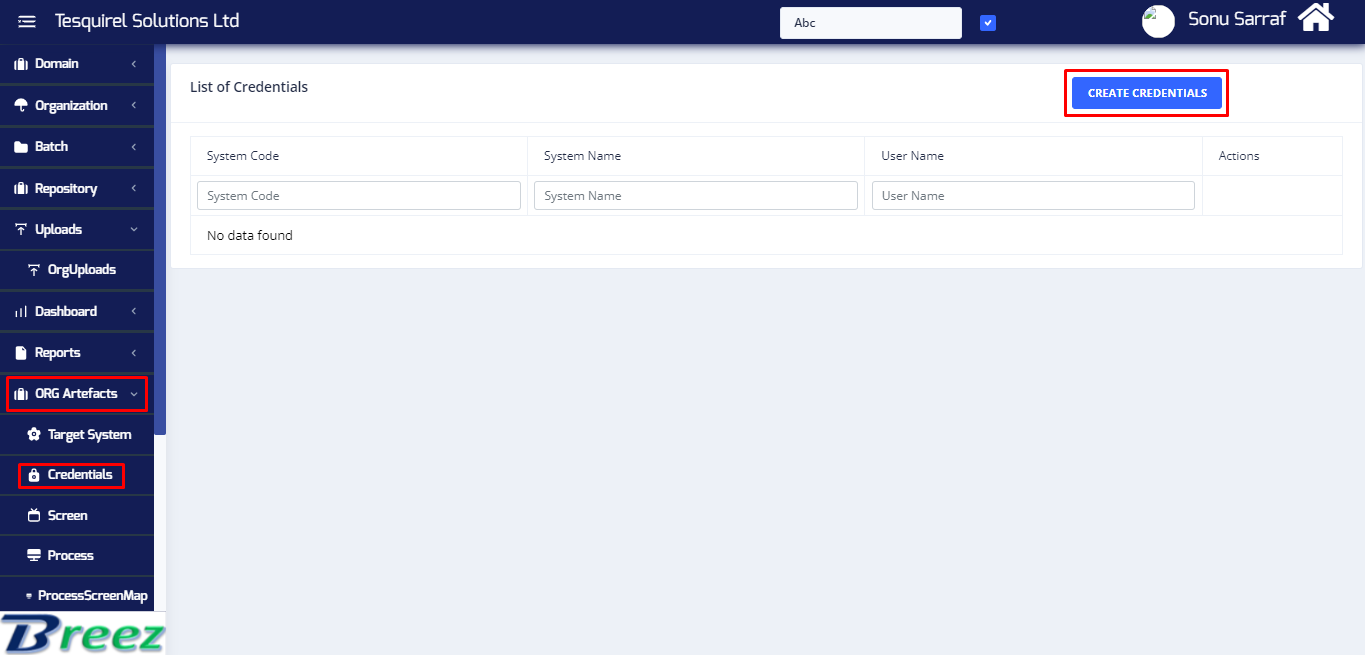
Fig:01-Create Credentials
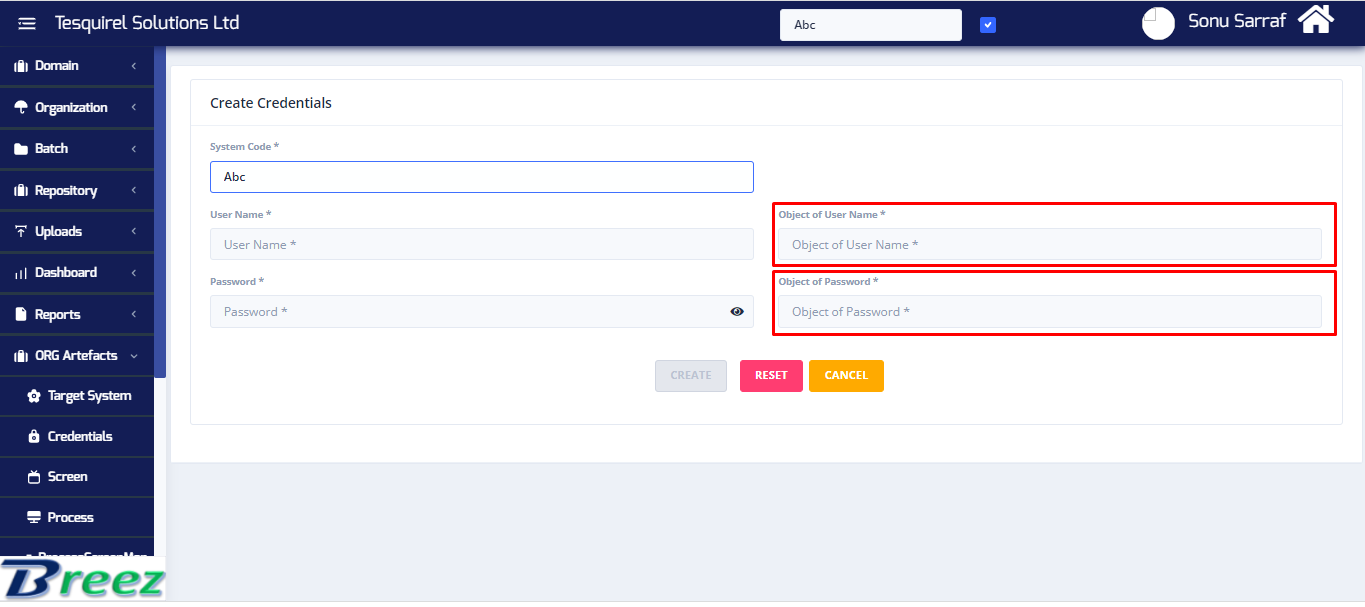
Fig:02-Click on Object
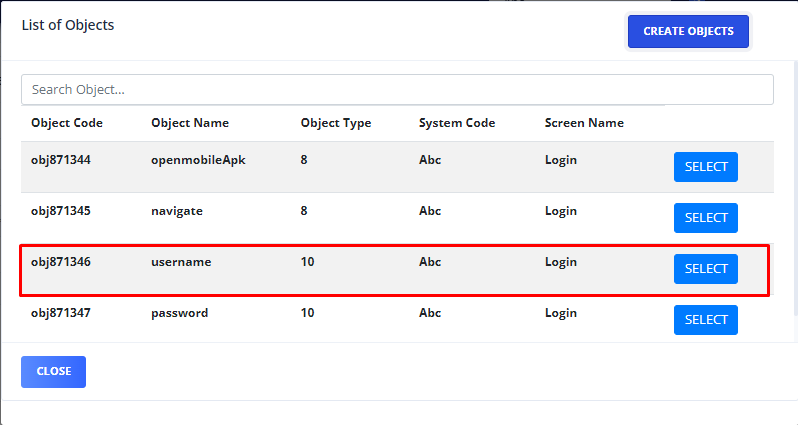
Fig:03-Object of Name

Fig:04-Create Credentials
Select the system code and then give the user name and password which is required for logging to the mobile application, after giving user name password select the object name, as shown in Fig:04
- By Element/Xpath Extraction
- By Repository
- By Org uploads
- By screens
- Beeze User Name and password.
- User Name of Target system.
- Device Name.(emulator name or Physical device name, for creating the device Please refer the Device Creation Document).
- Provide the Device Platform as Android.
- Provide the Screen Code (refer topic 1.2) for which user is trying to to element extraction.
- Then select Contain as “N”.
- Device as “Virtual Device” for using Emulator and “Real Device” for Physical Devices.
-
Automatic Creation of Objects and Steps :-
-
Generate Steps with screenshot indicator as Yes :-
-
Test Step File :-
-
Select Filter File :-
1.4 Creating Objects and Steps
Here the user can create the objects and steps by different ways for the target system. User need to create the objects and according to that objects steps are created automatically. For creating the Objects user should know the correct xpath of that particular objects. Users can get the xpath for mobile application by element extraction, Chrome inspects and appium. Users can create object in following ways
1.4.1. By Element/Xpath Extraction
User can open the Breeze EXE for Element/Xpath extraction and the steps re given below. Users can click on Xpath Extraction as shown in Fig:01
Fig:01-Home screen of EXE
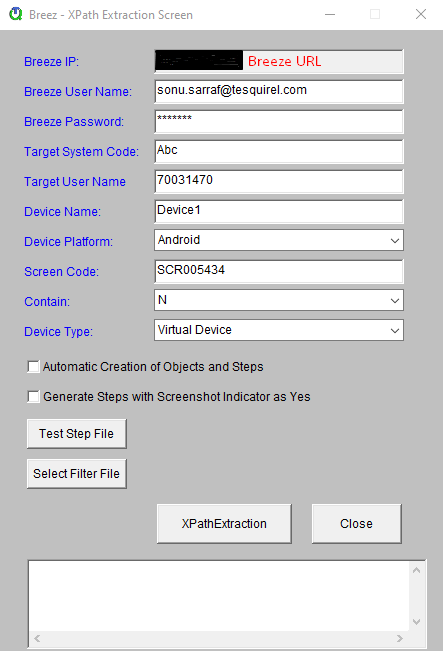
Fig:02-Xpath Extraction Screen
Fig:02 users have to enter all the required details like
In Fig:02 users can see multiple option present in the screen like
If user has clicked the check box for this option then the object and steps are created automatically after the extraction.
If user has clicked the checkbox for this option then the steps which are created by the extraction will have screenshot indicator as “Yes”, By default it “No” for all the steps.
Test setp file is used when the user wants to do the element/xpath extraction 2nd screen or further screens other then 1st screen. Test step file template can be downloaded from the Breeze Web Application, the template can be seen in Fig:03. Users donot need to mention the login screen in the test step file.
Here Users need to fill the data in the given column, the data from the target system for which the extraction is being done.
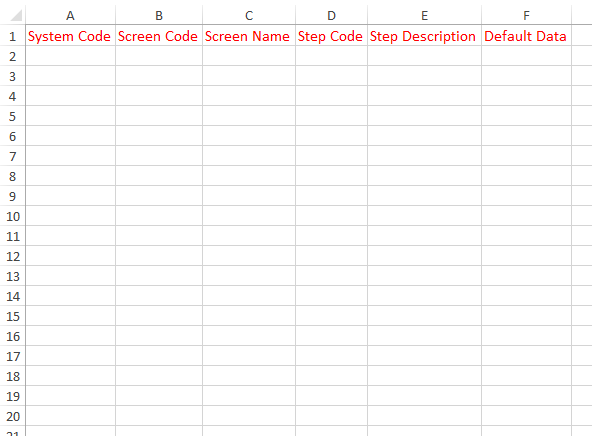
Fig:03-Test step file Template
Filter File is used when the user want the selected objects should be created, for example if the user want only 5 objects should be created out of 100 objects during the xpath extraction process then the user have to provide the filter file. In Filter file Template user will get 3 option. 1st option is to include an 2nd option is exclude and 3rd is xpath based on Parent which is shown in the Fig:04. User can get filter file template from Breeze Web Application.
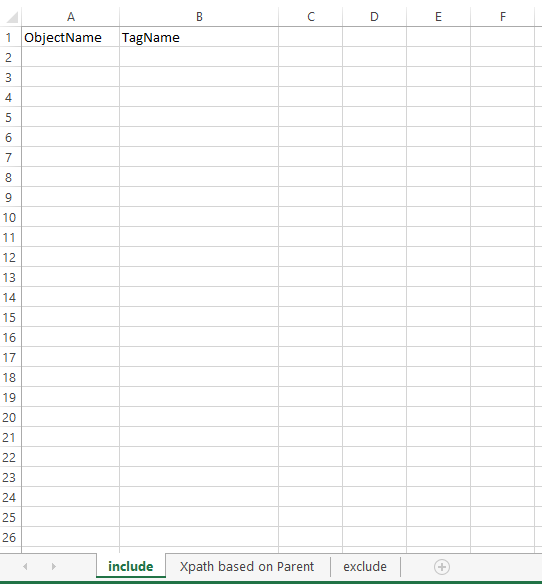
Fig:04-Filter File Template
1.4.2. By Repository
User can also create the objects and steps from Repository. The process is done manually, user can take the xpath with the help of “Appium” and “Chrome inspect”. Installation of Appium can be done from the Appium installation document. And chrome inspect can be done by the Google chrome browser.
Once the user has taken the xpath then User can go to the Breeze Web Application
Repository -> Objects -> Action icon -> Create Object
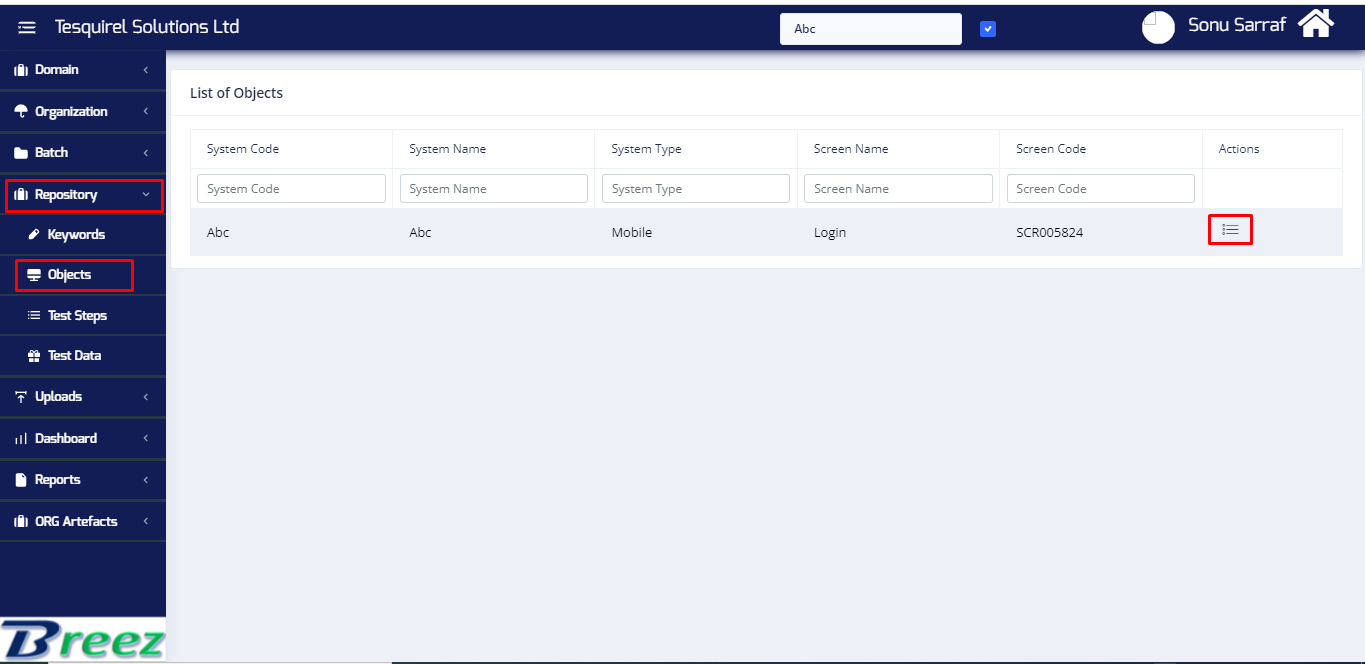
Fig:05-List of screen for objects
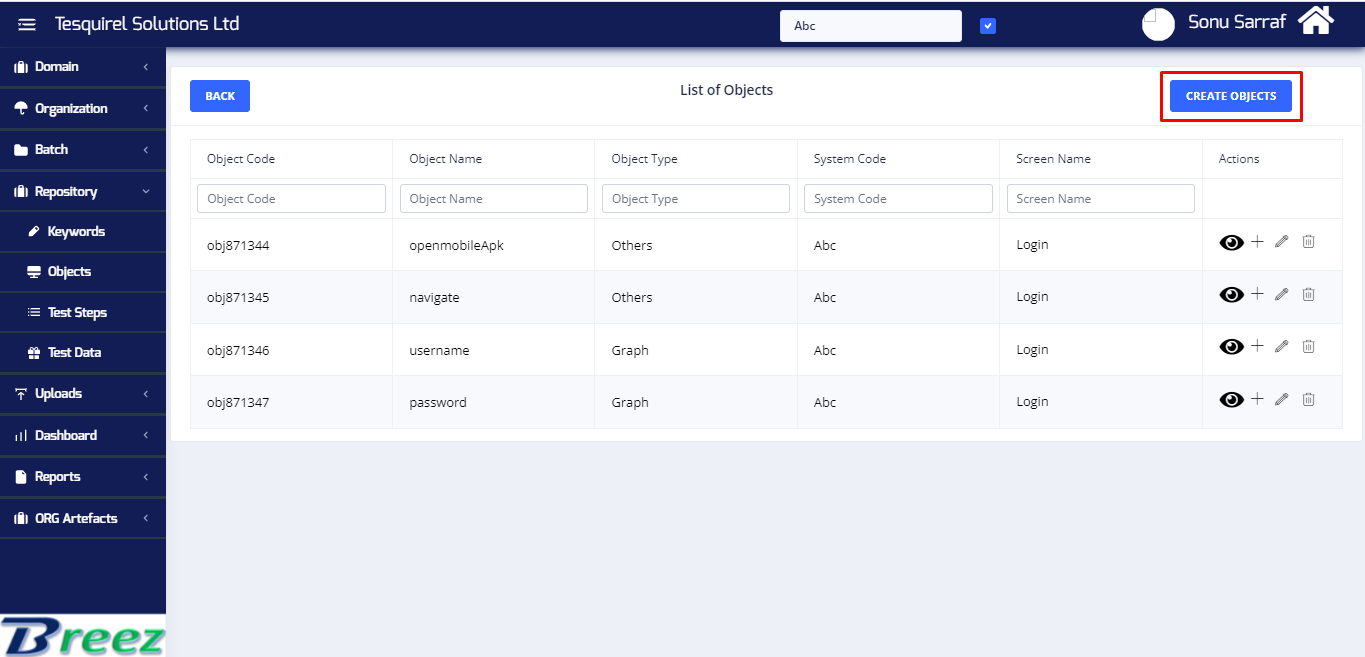
Fig:06-Create object screen
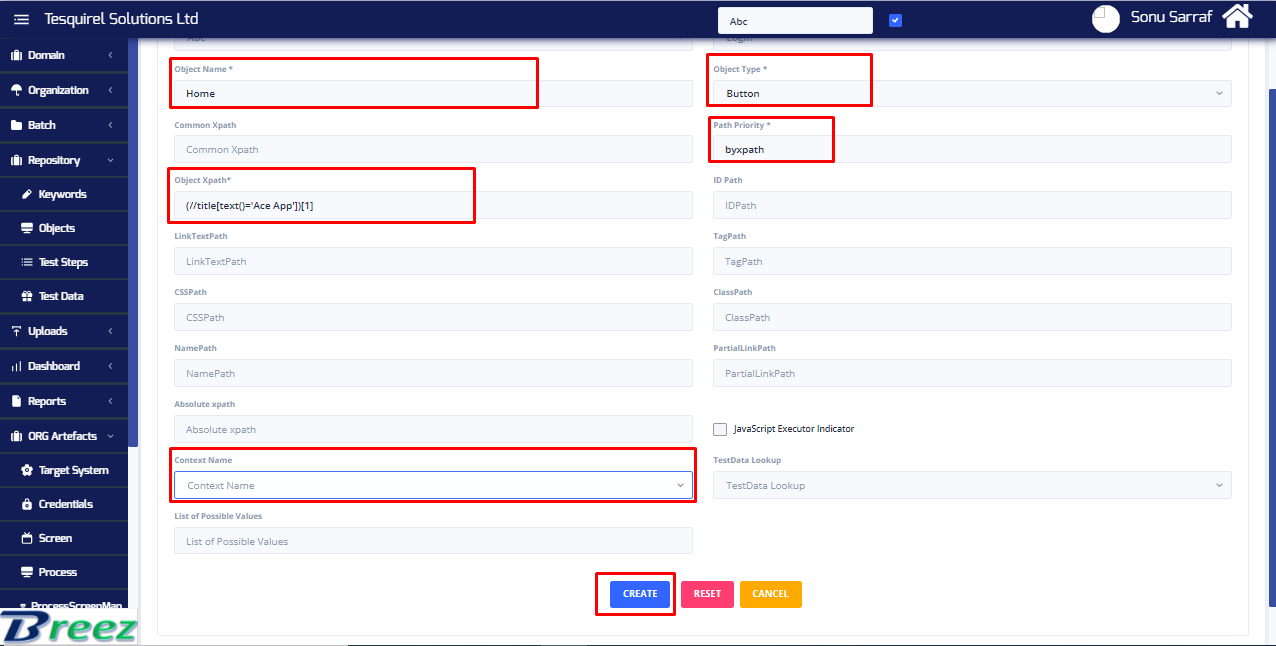
Fig:07-Create object
In Fig:07 users have to fill the given highlighted fields and then click on create. Once the user click the create then the step for the Particular objects will automatically gets create.
Context name is the information that can be used to characterize the situation of an entity. According to the context the automation can be performed, the Application can have to Context value one is Native_APP and other is WEB view.
1.4.3. By Org Uploads
Users can create the Objects and steps from org uploads. The steps can be followed for creation of objects.
Uploads -> Org Uploads
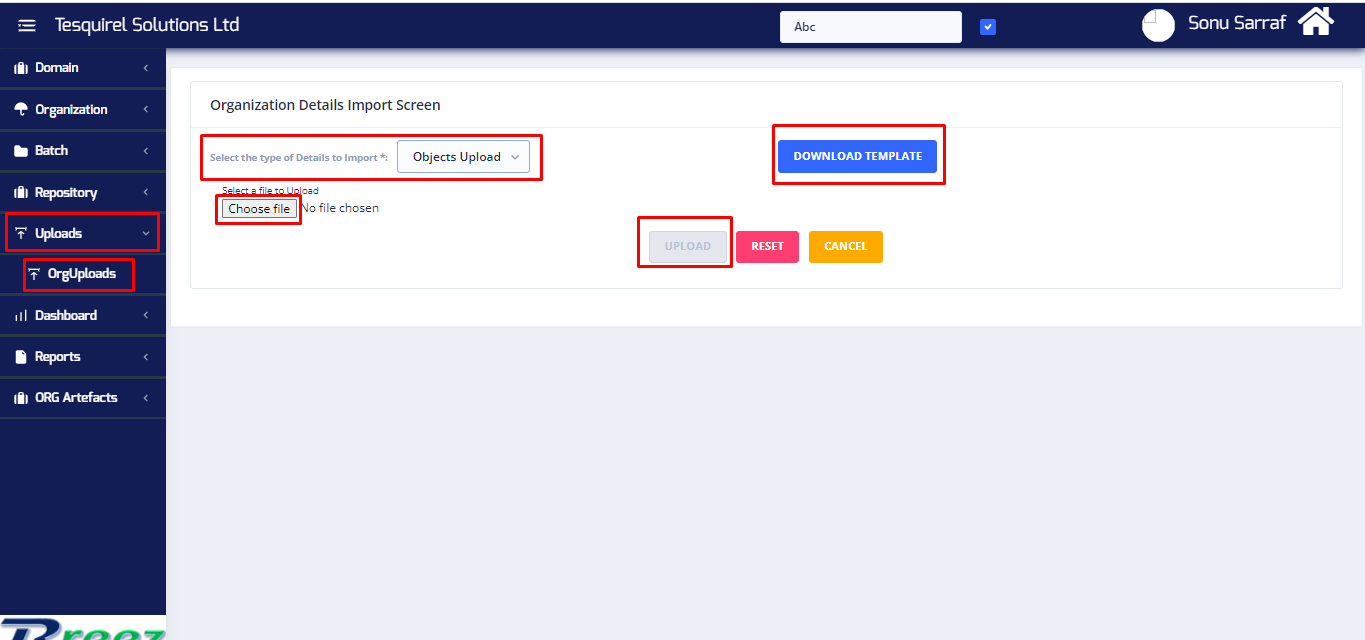
Fig:08-Org uploads
In Fig:08 Org uploads screen is shown here the user need to download the template and give the required fields. And then upload back to web application and click on upload. In this process the step are created automatically. The Template is shown in Fig:09.

Fig:09-Org object upload screen
1.4.4. By Screen
Users can also create the objects and steps from the screen.
ORG Artefacts -> Screen -> click on object icon,steps icon

Fig:10-Object from screen
After click in the icon present in the screen as shown in fig:10 it will navigate to the list of object which is shown in fig:11
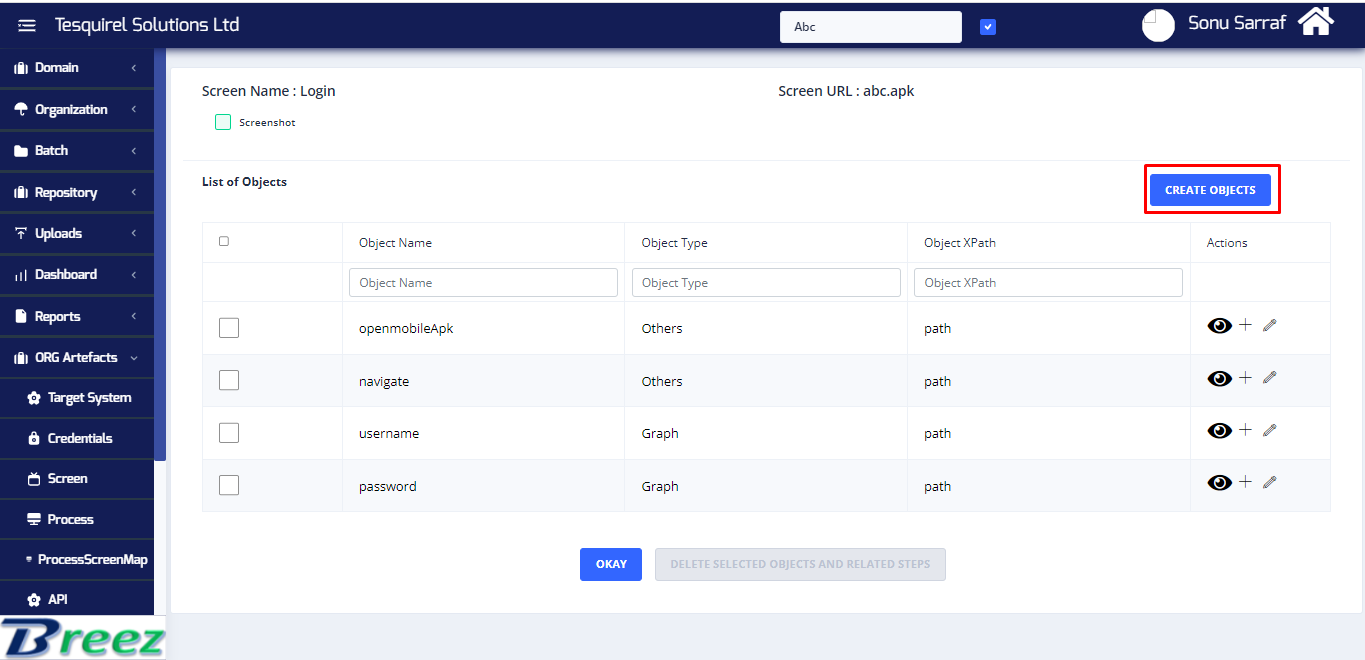
Fig:11-List of objects
In Fig:11 users have to click on create objects and then the user have to fill all the required value and click on create object during this process the steps are created automatically.
Once everything is done then the user can proceed for the automation. Mobile Automation can be done in Virtual Device (emulator) as well as Physical Device (Mobile phone).The creation of physical and Virtual device can be done from the Device creation document.
- After clicking on create APP, user need to Provide the,
- System Code (refer Fig:01)
- System Name (refer Fig:01)
- App Version
- App Size
- Package Name
- Activity Name
- Search for the Application for which user need to take package Name and Activity Name.
- The highlighted value is the package name which is shown in Fig:05, the user can copy it and paste it to package name field while creating APP.
- For taking Activity name user need to Click on Acitivities, shown in Fig:06.
- Search for .MainActivity or copy the first activity name in the list as shown in the Fig:07 and paste it in the Activity field while creating APP
-
Step input file with test data file which user can download from the Web Application of the Breeze.
- The downloaded Template for Step input file and the arrangement of steps are shown in Fig:09
- The downloaded Template for Test data file and the arrangement of steps are shown in Fig:10
1.5 App Creation
For automation in mobile application the user need to create APP in Breeze web application. The creation process is shown in the Fig:01
ORG Artefacts -> APP -> Create APP
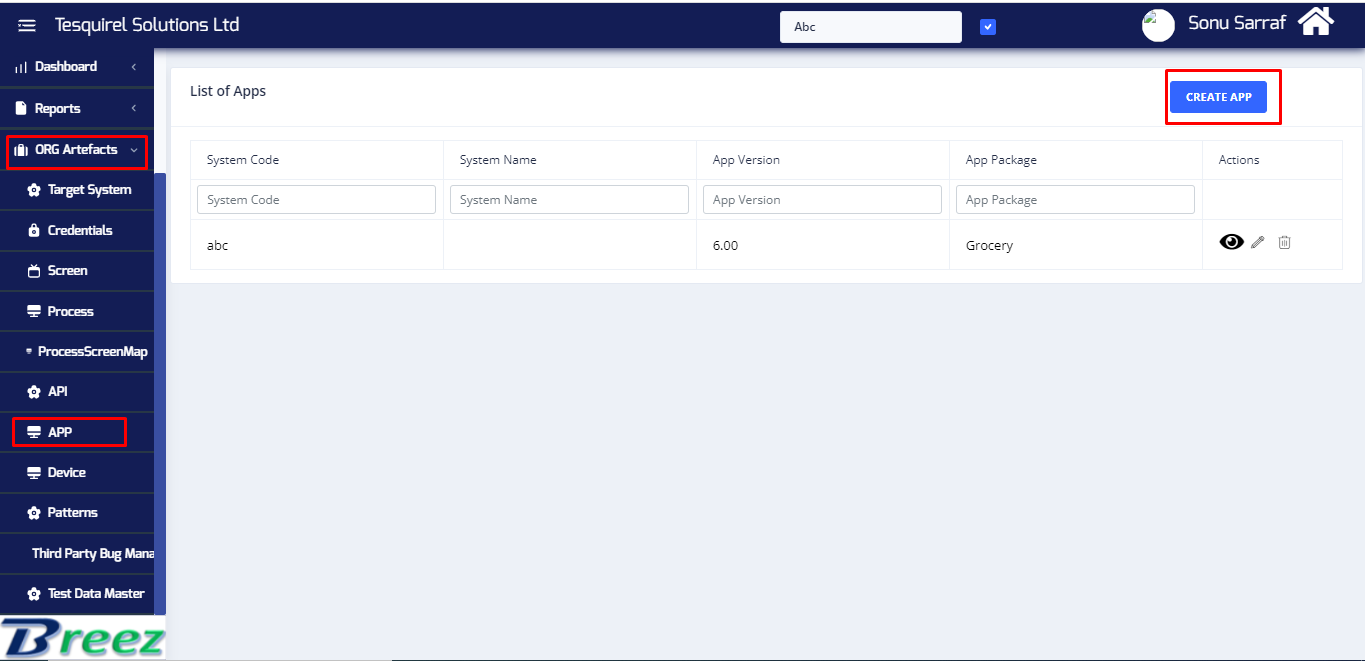
Fig:01-Creating app
Process for taking Activity Name and Package Name is explained in Topic - 1.5.1

Fig:02-App configuration
1.5.1. How to get package name and Activity Name
Package Name and Activity Name are required for automation so, user can get the Package Name and Activity Name by following steps.
User need to install “APK info” in the device for getting the Package name and Activity name, as shown in Fig:03.
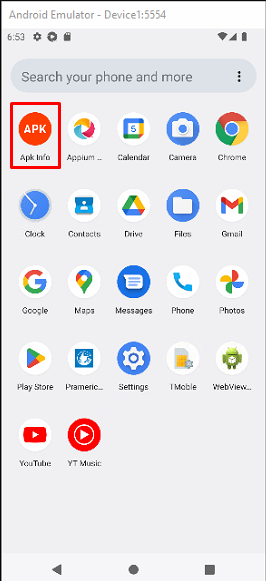
Fig:03-APK Info App
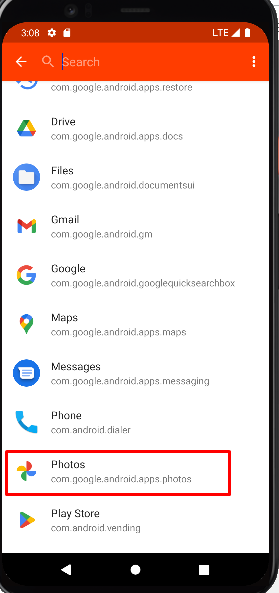
Fig:04-Searching App
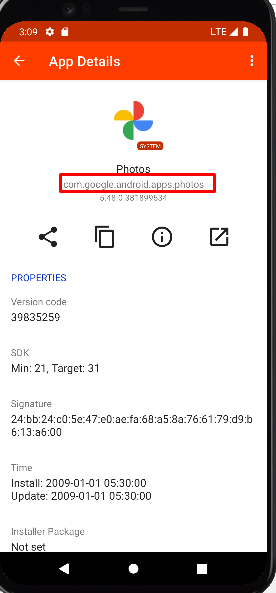
Fig:05-App configuration
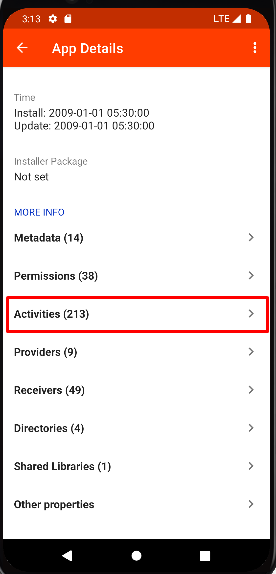
Fig:06-Activities
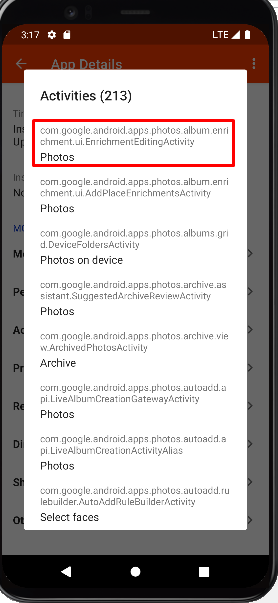
Fig:07-Activity Name
1.6 Creation of Step and Input File for Automation
Step to download file template is shown in Fig:08
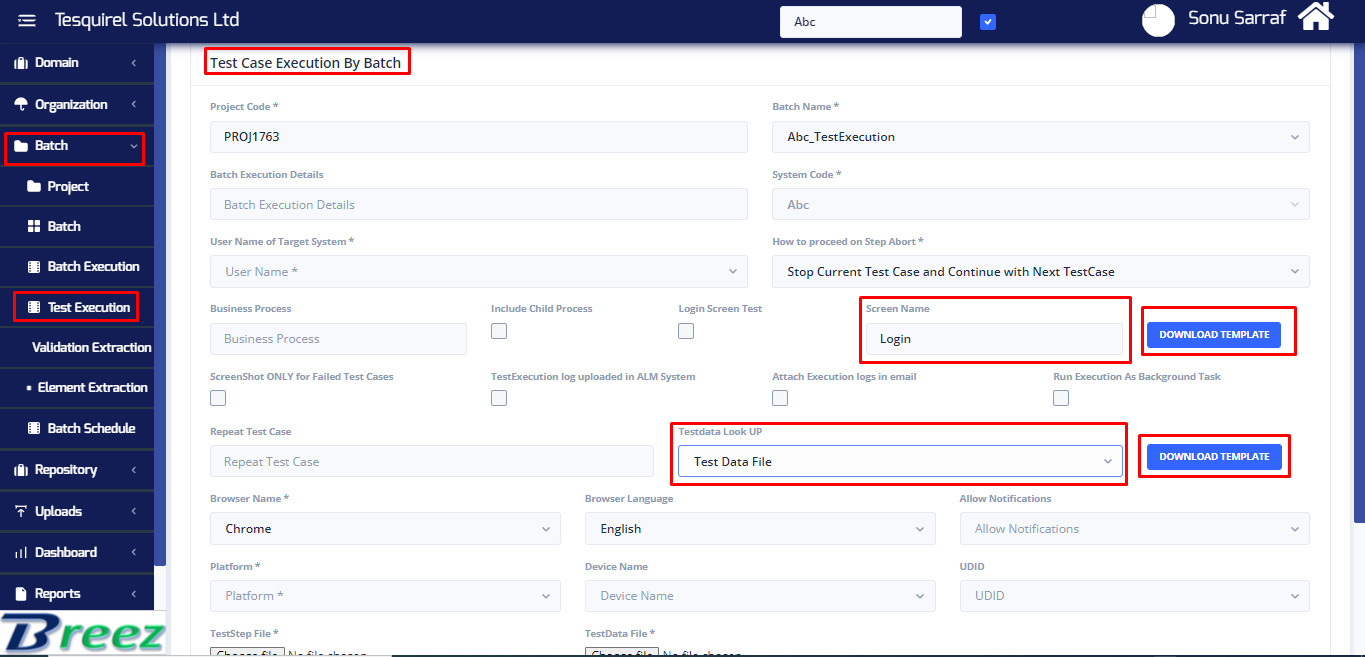
Fig:08-Test execution screen

Fig:09-Step Input File Template
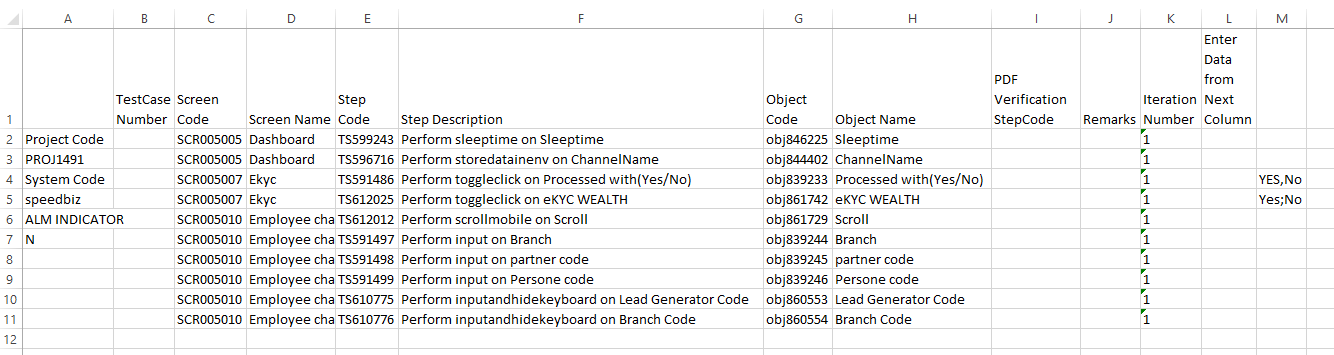
Fig:10-Test data File Template
2.Automation (Test Execution)
Automation for the Mobile Application can be only done from the Breeze EXE file. Before automation there are some pre-requisites which need to be done.
2.1 Pre-requisites
The following Pre- requisites are given below.
- Users need to create the Folder in the name of Target system and paste the apk file in that folder, the given path is. C:\Breez_Project\APK\TSQ\TST\TSTMGMT
- Please check the updated Xpath exe should be present at the given location, C:\Breez_Project
- Please check the updated Xpath exe should be present at the given location, C:\Breez_Project
- Need to create Device Virtual/ Physical.(Please refer to Device Creation User Guide)
- User need to arrange the step input file and test data file for automation.
2.2 Automation steps
Users need to start the breeze exe and then click in automation, as shown in Fig:01
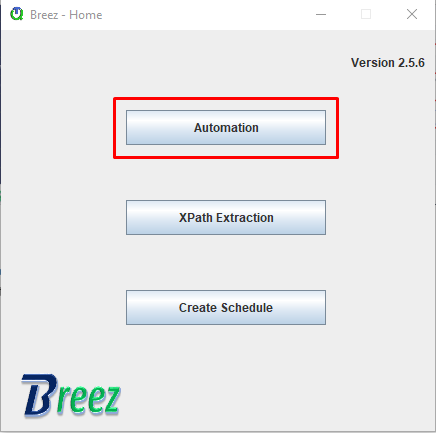
Fig:01-Home Screen
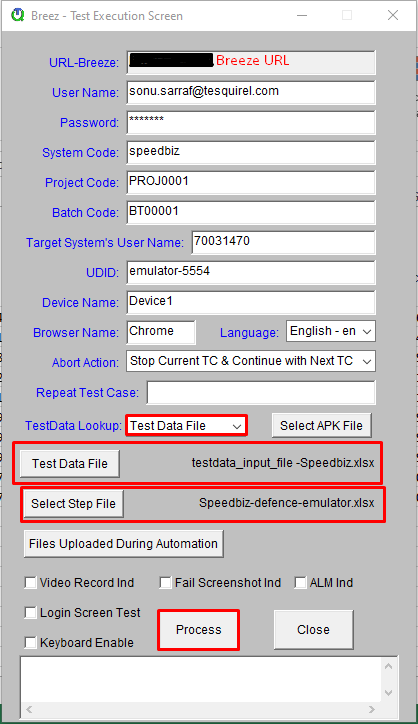
Fig:02-Test Execution Screen
In Fig:02 users need to Provide the data like
- Breeze Username and Password.
- System Code. (refer Fig:-1)
- Project Code. (refer Fig:-3)
- Batch Code. (refer Fig:-3)
- Target system Username. (refer topic:-1.3)
- UDID.
- Device Name.
After filling details User need to select “Test data File” in Testdata lookup and upload the test data file and “step input file” for automation and then click in Process.
Note: UDID and Device Name is given as per the device used for automation. The Creation of Device and process of taking UDID can be check from the User Guide for Device Creation.
2.2.1. Error Message Tracking
If User has done any mistake in the Step Input file or Test data file then Tracking of Error message is easy from Breeze application. The Process of Tracking error Message is shown in Fig:03.User can goto this console message and fix the input file error.
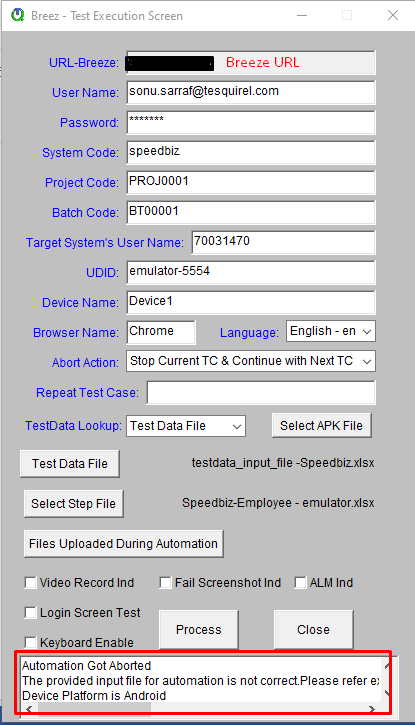
Fig:03-Error message Tracking
2.2.2. Test Execution Report
Test Execution Report is generated once the automation is completed, the report contains all the information able the steps execution present in the step input file. User can track every step information from the Test Execution Report.
Test Execution Report is generated in the local as well as it get update in the Breeze. The user can follow the Step to check the Execution Report.
In Local Device:- C:\Breez_Project\Reports\TSQ\TST\TSTMGMT, Here user can search the Project code under which Automation is done Search for Batch Execution ID.
In Breeze Web Application shown in fig:04
- Click on the Batch execution Id or View icon.
- User can see the all the details Present, Status of the execution, Abort action, Start Date, End Date. User can view the file which was uploaded during the automation by click on View Uploaded File button. And also user can click in View Test Execution Logs to check the no of test case, and status of the test case.
- Here users can check the status, start time, end time, test case name and number, defect code and title. Users can click on action button of the particular test case to view the step wise execution report.
- Here user can check the step level report and status, message, types of keywords used and also the screenshot of the particular step.

Fig:04-Test Execution Report
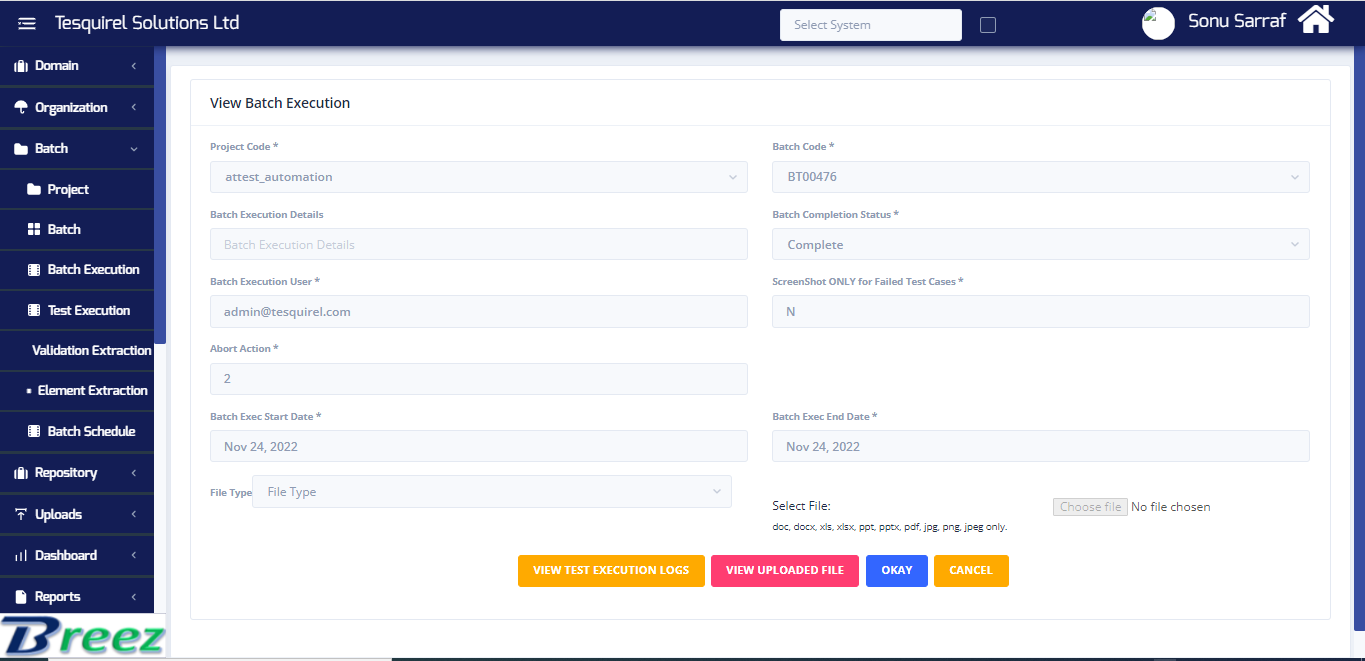
Fig:05-Test Execution Report
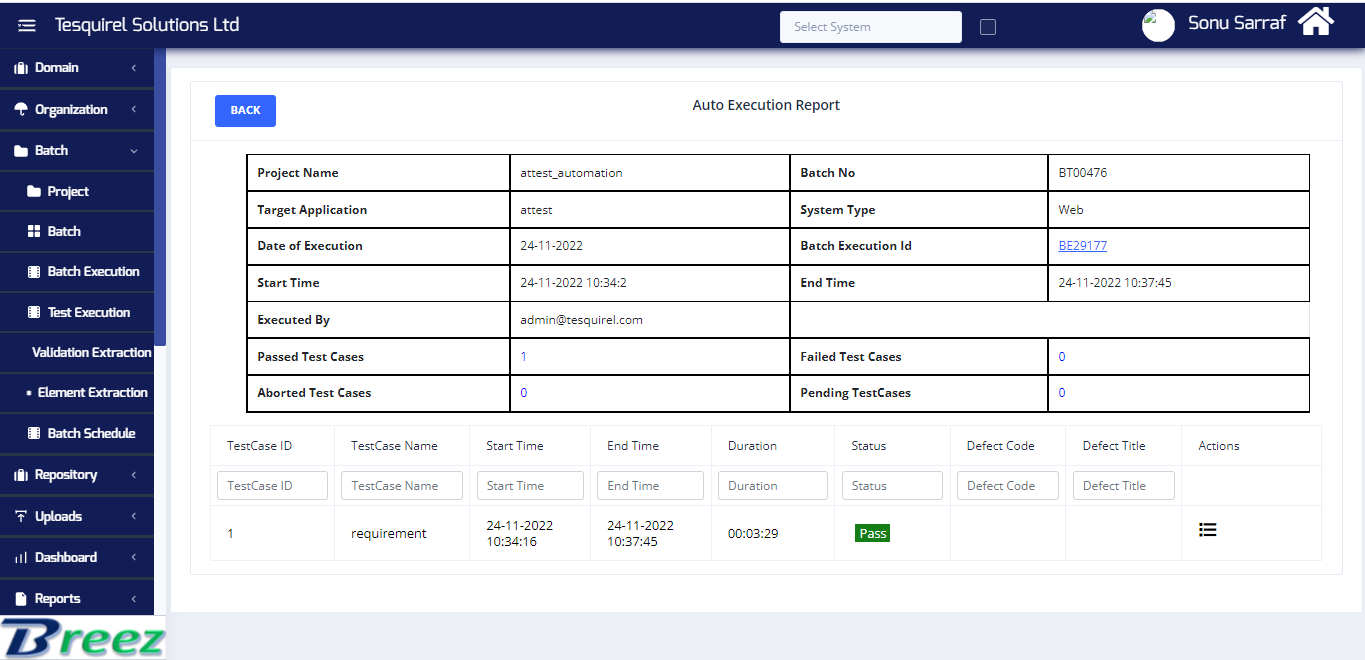
Fig:06-Test Execution Report
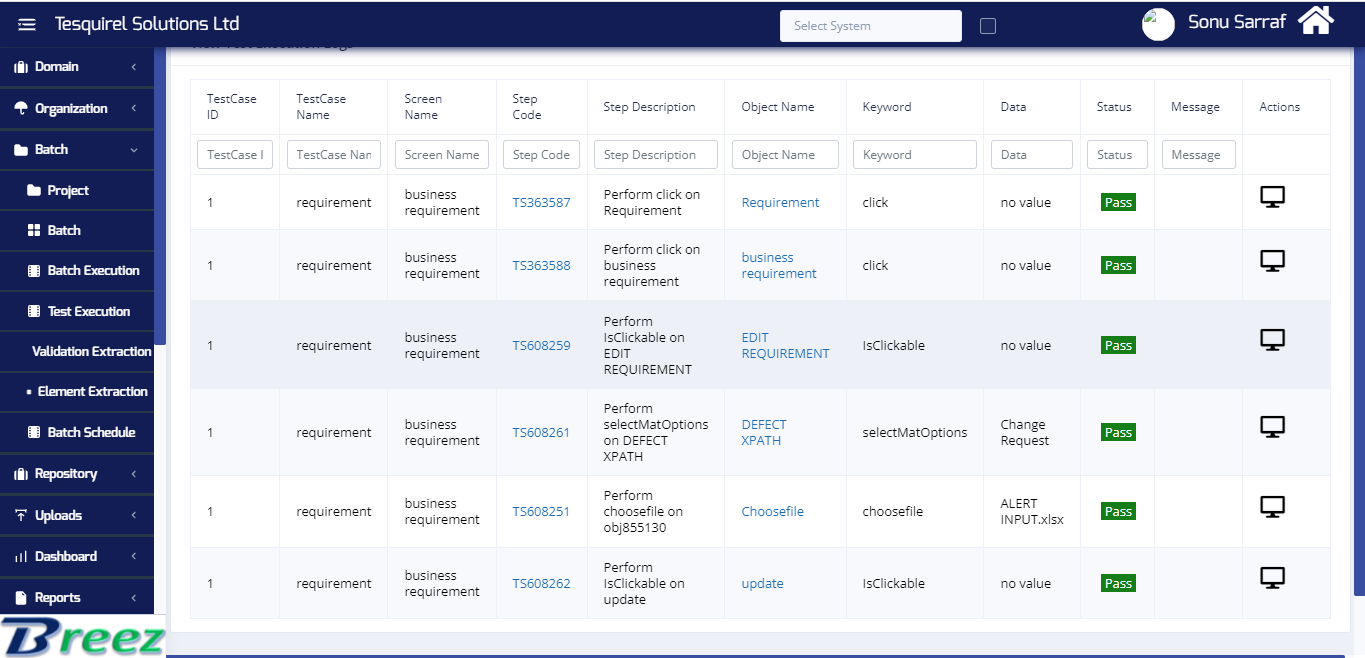
Fig:07-Test Execution Report
Overview
This document is for taking the xpath for mobile application, User can also take xpath Chrome inspect and Appium Desktop Server.
From Chrome inspect
For taking the xpath from the Chrome inspect we need to open chrome Browser and address bar user need to type : chrome://inspect Once it is done user can see the interface as shown in Fig:01, User can see the emulator name and then click on inspect button to take the xpath
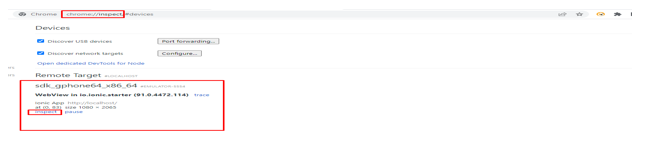
Fig:01-Chrome inspect
User need to click on the Element present at the top and then click on the object which need to take xpath. Here we can see that user has given the xpath and it is highlighting in the yellow box and in blue in the screen, which is show in the fig:02
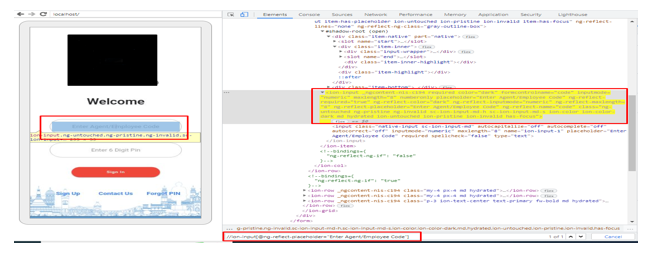
Fig:02-Object Xpath
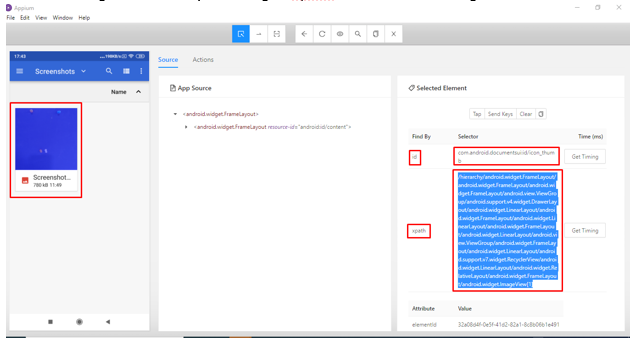
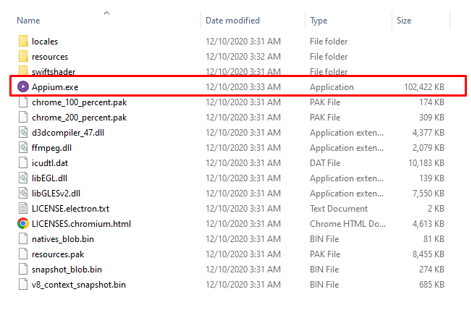
From Appium Desktop Server
- Double click on the appium icon
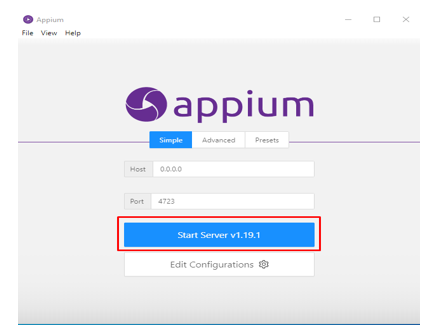
- Click on Start server
- Click on search icon
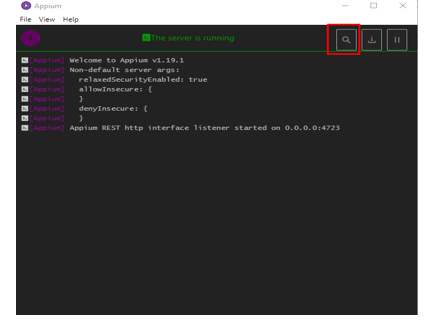
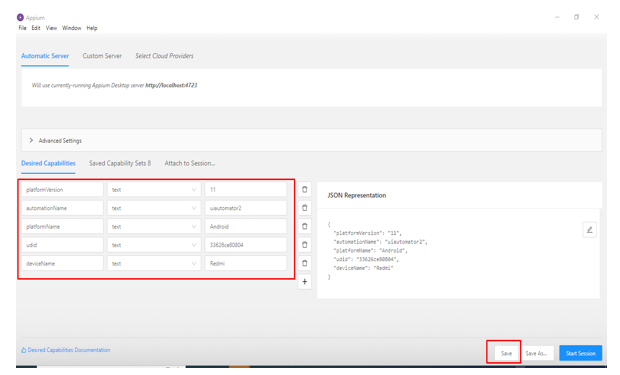
- Enter the data was shown below :
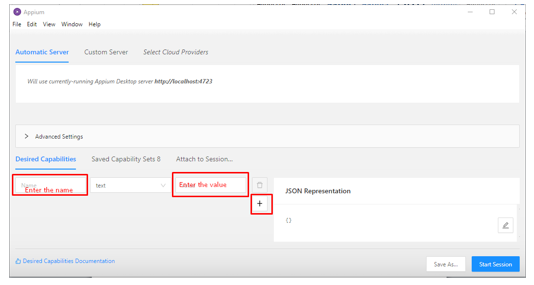
- Input the data as given in the screenshot and save it, How to take Device name and UDID can be learn from the User Guide for Device Creation.
- Then go to saved and select the system and click on start session
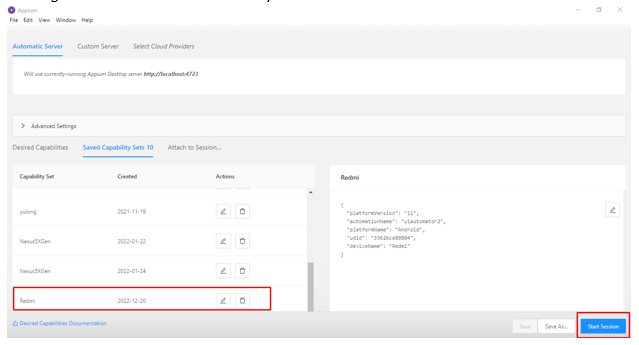
- Click on image and then you can get xpath and id of the image