Overview
This document is part of the User Manual for Breez - No Script Unified Automation Solution. This document is part of the series of User Guides created for Configuration and Automation of Test Execution using Breez.
Objects are the basic items on which the automation solution performs action. Actions vary based on the Type of the Object. This guide helps the user how Elements (Objects), Steps and all available and relevant locators are extracted from the Screens of the Target Application.
During execution, Automation program identifies the element uniquely identifying the appropriate locator, using its priority matrix based on Artificial Intelligence.
Apart from the Element Extraction option, Breez also provides flexibility to add Objects, Steps and Locators in alternative methods like - using our Chrome browser Extension, Open Source Extensions OR add manually as per user convenience.
NOTE:
1. Breez Element Extraction algorithm extracts Objects, Steps and all available locators for an element automatically.
2. Elements and Steps are extracted based on filters and steps are sequenced based on the order they appear on the web page. Breez has facility to re-order them through UI or an upload facility
Breez Element Extraction
Breez Element Extraction screen is located under Batch menu group.
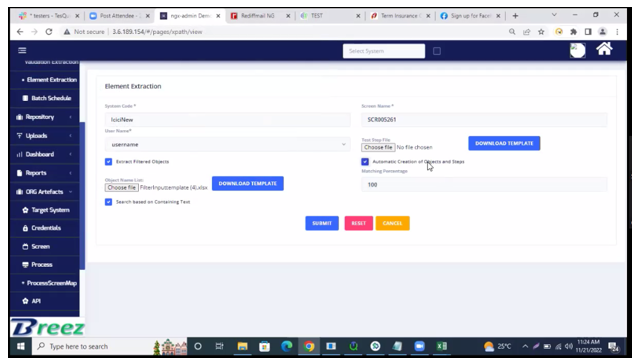
System Code
If the System code is already selected and appearing in the Navigation bar, System code is defaulted. Alternatively, user can search and select the System for which the Element Extraction is required. Pre-requisite: System should already have been created.
Screen Name:
User should select the required Screen Name next to extract the Elements for that screen. Pre-requisite: Screen should already have been created under the selected System.
Username:
If the Target system requires user credentials for access, users need to be created before element extraction using “Credentials” menu item. This field will display all usernames created for the Target system selected. User can select the username to be used for logging-in and traversing the flow to reach the screen of which the Element Extraction is required. Breez will use the password stored against the username automatically from the information already created.
Test Step File:
Test Step File is required when user is extracting Elements for Pop-up Screens.More details are given in Section-4, Template Files.
Download Template Button/s:
Breez helps the user in providing the filter files. User can download the template files for the format required by Breez Application. User just need to fill the data as required and upload the same. Once uploaded, Breez will extract the elements based on the values provided in the uploaded file.
Extract Filtered Objects:
This Checkbox provides an option to users to extract only those objects that are required to be automated. Omitting this option will extract all the elements appearing in the HTML file of the screen. Selecting the checkbox will display couple of more fields for user to select.
Automatic Creation of Objects and Steps:
This Checkbox is used for automatically creating the Objects, Steps and Locators for the selected screen. When this checkbox is not selected, Breez will download an excel sheet with all the object information for user verification. This file can be used to verify and input “Objects” or “Tags” names in the Filter file to extract only those required.
NOTE: It will be a good idea to extract all / filtered objects based on the input for a new screen, verify them in the downloaded excel and upload the “Object Name List File”, so that only required objects are stored in the system for that Screen.
Object Name List File (Extract Selected Objects only):
Selecting this checkbox will extract only those Objects / Elements and other relevant parameters as per the data / values provided in the uploaded list file, using the Template.
Matching Percentage:
Breez has intelligent matching of elements using AI algorithms. Based on the data / values in the input file, system will first check with the exact match of the word / phrase to identify the relevant element and other parameters. In case the exact match is not found, it will search for a nearest match using Intelligent Algorithms. User can decide the “Matching percentage” up to which the algorithm can search for element identification.
Search Based on Containing Text:
This field is used to identify the elements where the input ObjectName provided is not matching with the element name in the Target System Screen. On selecting this Checkbox, Breez intelligently identifies the elements containing the given text also matching the text based on the percentage mentioned in “Matching Percentage” field.
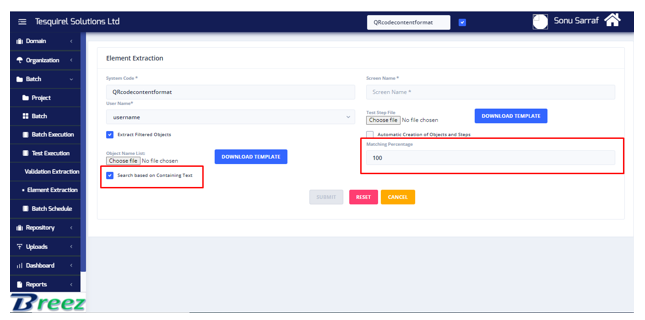
If the Checkbox is checked, it will search and identify the names containing that text. For example, if Matching Percentage is 100%, Checkbox is ticked and input is “male” it will give only return the result with objects “male” and “female” and others if any. .In case the percentage is less than 100, it will try to match using the algorithm and will come up with more alternatives if available like mail/male and others if any.
Template Files
Breez provides Templates to help users create the data and upload. In the Element Extraction Screen, user can download two types of Templates and create data.
Test Step File ( Useful to extract elements for Pop-up screens)
Object Name List File
Test Step File ( For handling Popup screens)
Following is the format for Template File for “Test Step”

This file and the data is required when the user is creating data for Pop-up screens. An example popup screen where this will be useful is given below:
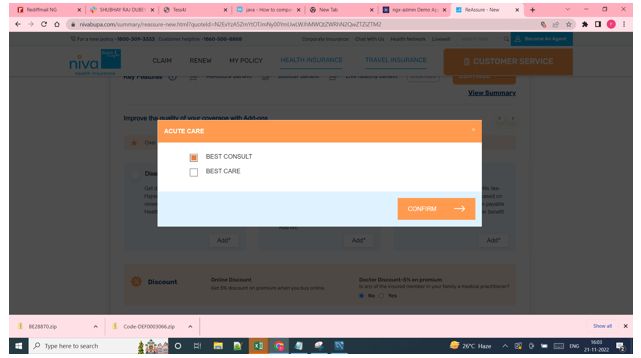
The information in the “Test Step file” will be used to navigate the steps in the Base Screen in which the Pop-up screen appears. Breez will mimic the steps the get the pop-up screen and verify the information / input in the popup screen.
NOTE: Breez has inbuilt algorithm based mechanism to identify the hierarchy of screens automatically and navigate to the subsequent screens in the flow, without user giving any input. User just need to identify and mark the parent for the new screen for which the Element Extraction is required and verify the navigation steps
Object Name List File
This file is used to create data file to extract only the relevant objects required for automation. Following is the Template:
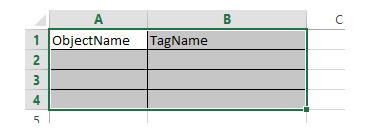
User can upload this file after inputting either
“ObjectName” or
“TagName” fields. If a user lists all the Objects that
are required to be
extracted from the Screen and provides it as input under
“ObjectName” field above, Breez
will extract all the steps and locators for those Objects. In case
the user wants to extract
locators and objects based on type ( Say input, button etc.,) , he can input the
related
“TagName” under the TagName column and Breez will extract all the
Objects and related
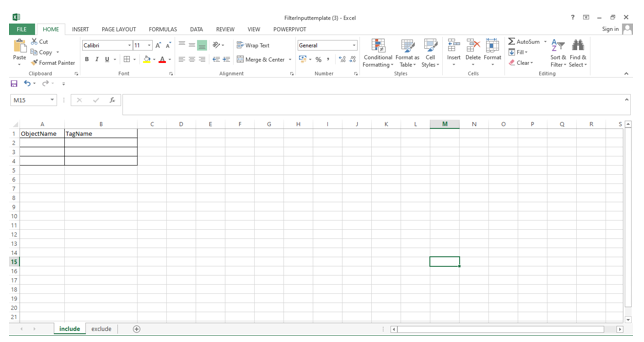
This Template has two worksheets. The Worksheet “include” is used to mention all the Objects / Elements the user would like to include in the extracted file. The Worksheet “exclude” is filled if the user wants to specifically exclude the Breez System from extracting any Objects / TagNames from the Target System Screen.
Verify the Created Objects, Steps and Locators
Post execution of Element Extraction and Creation of Objects, Steps and Locators, users can verify the details created. Once the creation is complete, system will take the control to the Screen with list of Elements:

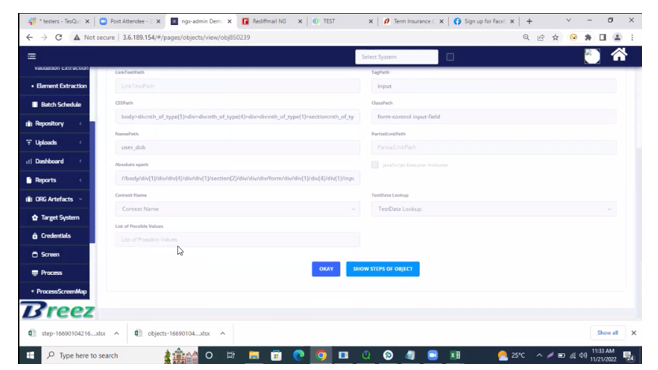
User can View the list of all objects created in this screen.
User can also use the Icons for next steps to further drill down the Objects. Clicking on eye icon will take the user to detailed screen for that particular object. User can view all the extracted locators that were available in the target system for the particular object.

User can view the steps created for the object by clicking on “SHOW STEPS OF OBJECT” button. System will display the Steps associated with that Object as below:
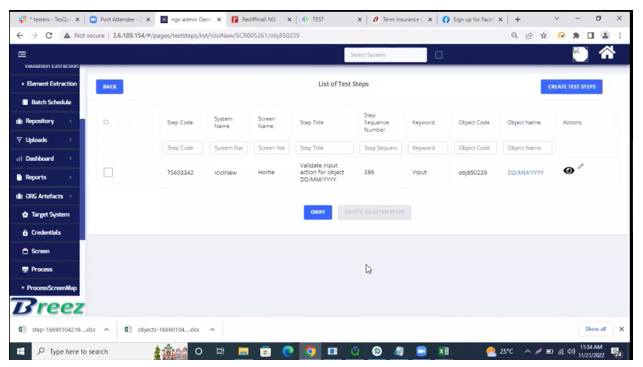
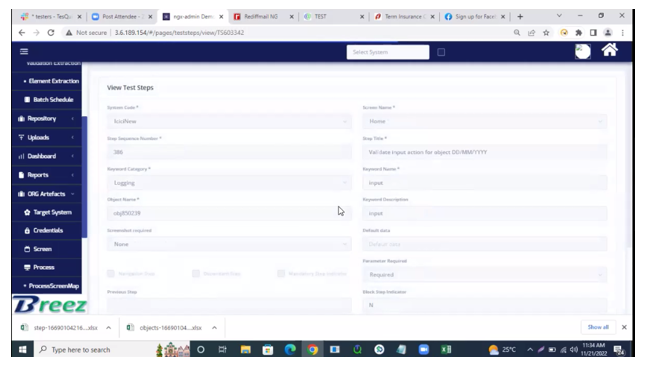
User can further view the Step details by clicking on “Eye” Icon or edit the details by clicking on “Pencil” Icon.
NOTE:
1. Clicking on ‘+’ Icon will take the control to New Step Create Screen and user can create step manually for that object under the current screen.
2. Clicking on Pencil Icon will take the control to the Edit screen for the object and user will be able to Edit the details like Object Name, Locator info etc.,
3. Above screens work similar to the Screens that are used for creating Objects, Steps manually. Details of 1 and 2 above as above are discussed in the respective document detailing the creation of Objects and Steps manually.